Toyota Highlander Service Manual: Timing gear case or timing chain case oil seal (2AZ-FE)
REPLACEMENT
1. REMOVE FRONT WHEEL RH
2. REMOVE FRONT FENDER SPLASH SHIELD FRONT RH
3. REMOVE FRONT FENDER APRON SEAL RH
4. REMOVE ENGINE COVER SUB-ASSY NO.1
5. REMOVE ENGINE MOUNTING STAY NO.2 RH
6. REMOVE ENGINE MOVING CONTROL ROD W/BRACKET (See page 14-24 )
7. REMOVE ENGINE MOUNTING STAY NO.2 RH
8. REMOVE ENGINE MOUNTING BRACKET NO.2 RH
9. REMOVE FAN AND GENERATOR V BELT (See page 14-5 )
10. REMOVE CRANKSHAFT PULLEY (See page 14-41 )
11. REMOVE TIMING GEAR CASE OR TIMING CHAIN CASE OIL SEAL
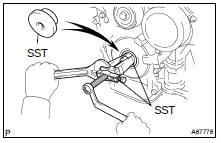
(a) Using SST, remove the oil seal.
SST 09308-10010, 09950-60010 (09951-00200)
12. INSTALL TIMING GEAR CASE OR TIMING CHAIN CASE OIL SEAL
(a) Apply MP grease to a new oil seal lip.
NOTICE: Keep the lip free from a foreign matter.
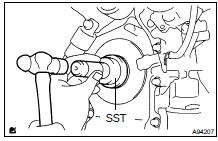
(b) Using SST and a hammer, tap in the oil seal until its surface is flush with the rear oil seal retainer edge.
SST 09223-22010
NOTICE: Wipe off extra grease from the crankshaft.
13. INSTALL CRANKSHAFT PULLEY (See page 14-41 )
14. INSTALL FAN AND GENERATOR V BELT (See page 14-5 ) Torque: 52 NVm (531 kgfVcm, 38 ftVlbf)
15. INSTALL ENGINE MOUNTING BRACKET NO.2 RH Torque: 52 NVm (531 kgfVcm, 38 ftVlbf)
16. INSTALL ENGINE MOUNTING STAY NO.2 RH Torque: 64 NVm (653 kgfVcm, 47 ftVlbf)
17. INSTALL ENGINE MOVING CONTROL ROD W/BRACKET (See page 14-24 )
18. INSTALL FRONT WHEEL RH
19. CHECK FOR ENGINE OIL LEAKS
 Cylinder head gasket (2AZ-FE)
REPLACEMENT
1. WORK FOR PREVENTING GASOLINE FROM SPILLING OUT (See page 11-1 )
2. REMOVE FRONT SUSPENSION BRACE SUB-ASSY UPPER CENTER (W/ FRONT
SUSPENSION
BRACE UPPER CENTER)
3. DRAIN COOLANT (S ...
 Engine rear oil seal (2AZ-FE)
REPLACEMENT
1. REMOVE AUTOMATIC TRANSAXLE ASSY (See page 40-12 )
HINT:
Remove and install the transaxle after removing the engine assy w/ transaxle.
2. REMOVE DRIVE PLATE & RING GEAR SUB-ASSY
...
More about Toyota Highlander:
Glass hatch
Opening the glass hatch
The glass hatch can be opened using the glass hatch opener.
vehicles without a smart key system
press the button to pop up the
glass hatch.
Raise the glass hatch using the
knob
The glass hatch cannot be open
when the back door is locked.
Unlock t ...
