Toyota Highlander Service Manual: Rear bumper
COMPONENTS

REPLACEMENT
HINT:
- The installation procedures are the removal procedures in reverse order. However, only installation procedures requiring additional information are included.
- A bolt without a torque specification is shown in the standard bolt chart (see page 03-2 ).
1. REMOVE DECK FLOOR BOX FRONT
2. REMOVE DECK FLOOR BOX REAR
3. REMOVE REAR FLOOR FINISH PLATE
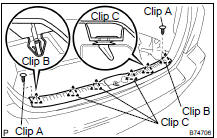
(a) Using a screwdriver, remove the 2 clips labeled A and 2 clips labeled B, 4 clips labeled C and finish plate.
HINT: Tape the screwdriver tip before use.
4. REMOVE QUARTER PANEL MUDGUARD SUB-ASSY REAR LH (W/ MUDGUARD)
(a) Remove the 3 clips, screw and mudguard.
5. REMOVE QUARTER PANEL MUDGUARD SUB-ASSY REAR RH (W/ MUDGUARD)
HINT: Use the same procedure described for the LH side.
6. REMOVE REAR BUMPER COVER
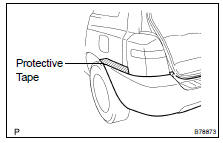
(a) Put protective tape under the quarter panel.
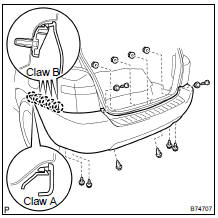
(b) Remove the 6 screws, 4 nuts and 2 clips.
(c) Using a screwdriver, disengage the claw labeled A, 4 claws labeled B and bumper cover.
HINT: Tape the screwdriver tip before use.
7. REMOVE REAR BUMPER ENERGY ABSORBER
8. REMOVE REAR BUMPER REINFORCEMENT NO.1
(a) Remove the 6 nuts and reinforcement.
9. REMOVE REAR BUMPER BAR
10. REMOVE REAR BUMPER BAR LH
11. REMOVE REAR BUMPER BAR RH
12. REMOVE REAR BUMPER SIDE RETAINER LH
(a) Remove the 3 screws and side retainer.
13. REMOVE REAR BUMPER SIDE RETAINER RH
(a) Remove the 3 screws and side retainer.
14. REMOVE REAR BUMPER SUPPORT NO.1
15. REMOVE REAR BUMPER SIDE MOUNTING BRACKET LH
(a) Remove the screw and bracket.
16. REMOVE REAR BUMPER SIDE MOUNTING BRACKET RH
(a) Remove the screw and bracket.
17. REMOVE REAR BUMPER SIDE SUPPORT LH
18. REMOVE REAR BUMPER SIDE SUPPORT RH
19. INSTALL REAR BUMPER SIDE MOUNTING BRACKET LH
(a) Install the bracket with the screw.
Torque: 3.0 NVm (31 kgfVcm, 27 in.Vlbf)
20. INSTALL REAR BUMPER SIDE MOUNTING BRACKET RH
HINT: Use the same procedure described for the LH side.
21. INSTALL REAR BUMPER REINFORCEMENT NO.1
(a) Install the reinforcement with the 6 nuts.
Torque: 27 NVm (275 kgfVcm, 20 ftVlbf)
22. INSTALL REAR BUMPER COVER
(a) Engage the 10 claws.
(b) Install the bumper cover with the 2 clips, 6 screws and 4 nuts.
Torque: 3.0 NVm (31 kgfVcm, 27 in.Vlbf) for bolt Torque: 8.0 NVm (85 kgfVcm, 71 in.Vlbf) for nut
23. INSTALL QUARTER PANEL MUDGUARD SUB-ASSY REAR LH (W/ MUDGUARD)
(a) Install the mudguard with the 3 clips and bolt.
Torque: 3.0 NVm (31 kgfVcm, 27 in.Vlbf)
24. INSTALL QUARTER PANEL MUDGUARD SUB-ASSY REAR RH (W/ MUDGUARD)
HINT: Use the same procedure described for the LH side.
 Front bumper
COMPONENTS
REPLACEMENT
HINT:
The installation procedures are the removal procedures in reverse
order. However, only installation
procedures requiring additional information are included.
...
 Rear spoiler
REPLACEMENT
1. REMOVE BACK WINDOW PANEL TRIM UPPER (See page 75-20 )
2. REMOVE REAR SPOILER
(a) Remove the 2 bolts and nut.
(b) Using a heat light, heat the body and rear spoiler to 40 to
60 ...
More about Toyota Highlander:
Overhaul
HINT:
COMPONENTS: See page 27-2 .
1. REMOVE DECK SIDE TRIM COVER LH
2. REMOVE REAR WHEEL
3. SEPARATE REAR STABILIZER LINK ASSY LH
(a) Support the rear axle carrier with a jack.
(b) Remove the nut and disconnect the stabilizer link from the
shock absorber.
HINT:
If the ball joint tur ...
