Toyota Highlander Service Manual: Front bumper
COMPONENTS
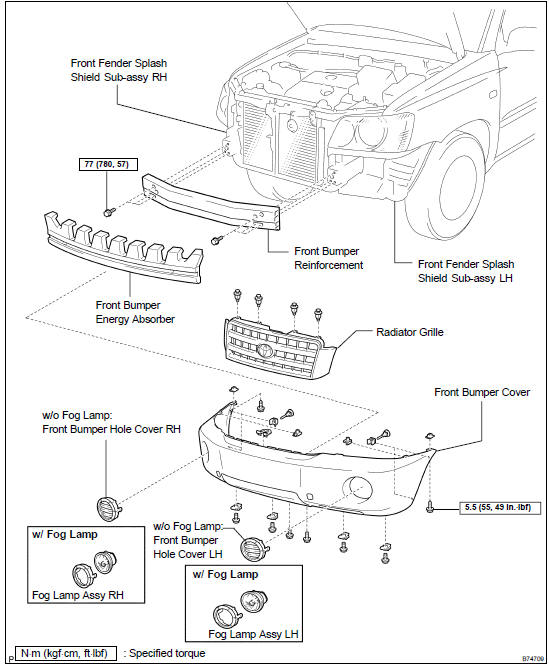
REPLACEMENT
HINT:
- The installation procedures are the removal procedures in reverse order. However, only installation procedures requiring additional information are included.
- A bolt without a torque specification is shown in the standard bolt chart (see page 03-2 ).
1. REMOVE RADIATOR GRILLE
(a) Using a screwdriver, disengage the 4 claws and remove the 4 clips labeled A, 2 clips labeled B and grille.
HINT: Tape the screwdriver tip before use.
2. REMOVE FRONT FENDER SPLASH SHIELD SUB-ASSY LH
(a) Remove the screw and 3 clips.
(b) Partially remove the fender liner.
HINT: It is not necessary to fully remove the fender liner completely.
Partially remove it so that the bumper cover can be removed in step (4).
3. REMOVE FRONT FENDER SPLASH SHIELD SUB-ASSY RH
HINT: Use the same procedure described for the LH side.
4. REMOVE FRONT BUMPER COVER
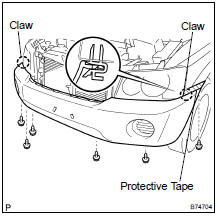
(a) Put protective tape under the front fender.
(b) Remove the 6 screws.
(c) Using a screwdriver, disengage the 2 claws and remove the bumper cover.
HINT: Tape the screwdriver tip before use.
(d) w/ Fog lamp: Disconnect the 2 connectors.
5. REMOVE FRONT BUMPER ENERGY ABSORBER
6. REMOVE FRONT BUMPER REINFORCEMENT
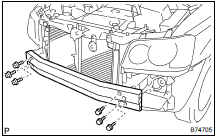
(a) Remove the 6 bolts and reinforcement
7. REMOVE FOG LAMP ASSY LH (W/ FOG LAMP)
8. REMOVE FOG LAMP ASSY RH (W/ FOG LAMP)
9. REMOVE FRONT BUMPER HOLE COVER (W/O FOG LAMP)
10. INSTALL FRONT BUMPER REINFORCEMENT
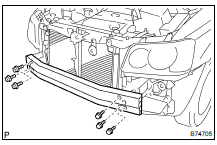
(a) Install the reinforcement with the 6 bolts.
Torque: 77 NVm (780 kgfVcm, 57 ftVlbf)
11. INSTALL FRONT BUMPER COVER
(a) Install the bumper cover with the 6 screws.
Torque: 5.5 NVm (55 kgfVcm, 49 in.Vlbf)

 Rear bumper
COMPONENTS
REPLACEMENT
HINT:
The installation procedures are the removal procedures in reverse
order. However, only installation
procedures requiring additional information are included.
...
More about Toyota Highlander:
High beam automatic turning on or off conditions
When all of the following conditions are met, the high beam will be
automatically turned on (after approximately 1 second):
vehicle speed is above approximately 21 mph (34 km/h).
The area ahead of the vehicle is dark.
There are no oncoming or preceding vehicles with headli ...
