Toyota Highlander Service Manual: Multi-display controller sub-ASSY
REPLACEMENT
HINT:
- COMPONENTS: See page 67-2
- Installation is in the reverse order of removal.
1. REMOVE REAR SEAT ASSY RH (SEE PAGE 72-35 )
2. REMOVE REAR SEAT ASSY LH (SEE PAGE 72-28 )
3. REMOVE REAR DOOR SCUFF PLATE RH (SEE PAGE 76-21 )
4. REMOVE REAR DOOR SCUFF PLATE LH (SEE PAGE 76-21 )
5. REMOVE REAR DOOR OPENING TRIM WEATHERSTRIP RH (SEE PAGE 76-21 )
6. REMOVE REAR DOOR OPENING TRIM WEATHERSTRIP LH (SEE PAGE 76-21 )
7. REMOVE TONNEAU COVER ASSY (SEE PAGE 76-21 )
8. REMOVE DECK BOARD SUB-ASSY (SEE PAGE 76-21 )
9. REMOVE DECK BOARD SUB-ASSY NO.2 (SEE PAGE 76-21 )
10. REMOVE DECK BOARD SUB-ASSY NO.3 (SEE PAGE 76-21 )
11. REMOVE DECK SIDE TRIM BOX RH (SEE PAGE 76-21 )
12. REMOVE DECK SIDE TRIM BOX LH (SEE PAGE 76-21 )
13. REMOVE REAR FLOOR FINISH PLATE (SEE PAGE 76-21 )
14. REMOVE DECK TRIM SIDE PANEL ASSY RH (SEE PAGE 76-21 )
15. REMOVE DECK TRIM SIDE PANEL ASSY LH (SEE PAGE 76-21 )
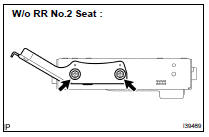
16. REMOVE REAR SEAT SUB FLOOR PANEL ASSY (W/O RR NO.2 SEAT)
(a) Remove the 3 bolts, 3 nuts and rear seat sub floor panel.
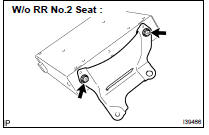
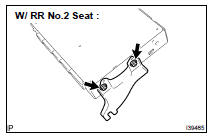
17. REMOVE MULTI- DISPLAY CONTROLLER W/BRACKET
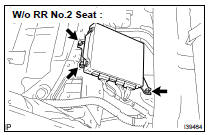
(a) Disconnect the connectors.
(b) W/o RR No.2 Seat: Remove the 2 bolts and nut and the multi-display controller w/bracket.
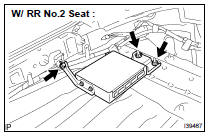
(c) W/ RR No.2 Seat: Remove the 2 nuts and bolt and the multi-display controller w/bracket.
18. REMOVE MULTI-DISPLA Y CONTROLER BRACKET A
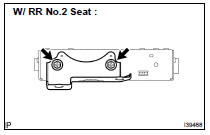
(a) Remove the 2 screws and the multi-display controller bracket A.
19. REMOVE MULTI-DISPLA Y CONTROLER BRACKET B
(a) Remove the 2 screws and the multi-display controller bracket B.
20. REMOVE MULTI-DISPLA Y CONTROLLER SUB-ASSY
 Voltage inverter ASSY
REPLACEMENT
HINT:
COMPONENTS: See page 67-2
Installation is in the reverse order of removal.
1. REMOVE INSTRUMENT CLUSTER FINISH PANEL ASSY CENTER (SEE PAGE 71-10 )
2. REMOVE FRONT SEAT ARM ...
 Television display ASSY
REPLACEMENT
HINT:
COMPONENTS: See page 67-2
Installation is in the reverse order of removal.
1. REMOVE TELEVISION BASE
(a) Release the 4 claws and remove the television base.
2. REMOVE ...
More about Toyota Highlander:
Transfer
PREPARATION
SST
Recomended Tools
SSM
Equipment
Lubricant
...
