Toyota Highlander Service Manual: Charcoal canister ASSY (2AZ-FE)
REPLACEMENT
1. REMOVE EXHAUST PIPE ASSY CENTER
(a) Remove the 4 bolts and 2 compression springs.
(b) Remove the exhaust pipe center from the 4 exhaust pipe supports.
(c) Remove the 2 gaskets from the exhaust pipe front and exhaust pipe center.

2. REMOVE FRONT FLOOR HEAT INSULATOR NO.3
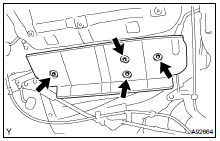
(a) Remove the 4 bolts and heat insulator.
3. REMOVE CHARCOAL CANISTER ASSY
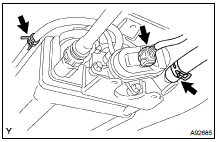
(a) Disconnect the pump module connector.
(b) Disconnect the fuel emission hose.
(c) Disconnect the air inlet line hose.
(d) Disconnect the fuel tank vent hose.
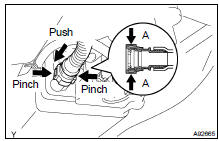
- Push the connector deeply into the charcoal canister to release the locking tab.
- Pinch portion A.
- Pull out the connector.
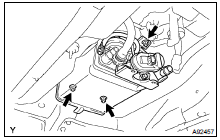
(e) Remove the 3 nuts and charcoal canister.
4. INSTALL CHARCOAL CANISTER ASSY
(a) Install the charcoal canister with the 3 nuts.
Torque: 5.5 NVm (56 kgfVcm, 49 in.Vlbf)
5. INSTALL FRONT FLOOR HEAT INSULATOR NO.3

(a) Install the heat insulator with the 4 nuts.
Torque: 4.9 NVm (50 kgfVcm, 43 in.Vlbf)
6. INSTALL EXHAUST PIPE ASSY CENTER
(a) Install the exhaust pipe center to the 4 exhaust pipe supports.
(b) Install a new gasket and the pipe center to the pipe front with the 2 bolts.
Torque: 56 NVm (571 kgfVcm, 41 ftVlbf)

(c) Using a vernier caliper, measure the free length of the compression spring.
Minimum length: 40.5 mm (1.594 in.) for center to tail
If the free length is less than minimum, replace the compression spring.
(d) Install a new gasket and the pipe center to the pipe tail with the 2 bolts and 2 compression springs.
Torque: 48 NVm (489 kgfVcm, 35 ftVlbf)
7. CHECK FOR EXHAUST GAS LEAKS
If gas is leaking, tighten the areas necessary to stop the leak.
If damaged, replace it.
 Inspection
1. INSPECT VENTILATION VALVE SUB-ASSY
(a) Install a clean hose to the ventilation valve.
(b) Check ventilation valve operation.
Blow air into the cylinder head side, and check that
a ...
 Ventilation valve Sub-ASSY (2AZ-FE)
REPLACEMENT
1. REMOVE VENTILATION VALVE SUB-ASSY
(a) Disconnect the ventilation hose from the ventilation valve.
(b) Remove the ventilation valve.
2. INSTALL VENTILATION VALVE SUB-ASSY
(a) Instal ...
More about Toyota Highlander:
Using the rear view monitor system
Screen description
The rear view monitor system screen will be displayed if the shift
lever is shifted to r while the engine switch is in “on” position.
Vehicle width guide lines
the line indicates a guide path when the vehicle is being backed
straight up.The displayed width is wid ...
