Toyota Highlander Service Manual: Roof headlining ASSY
COMPONENTS
REPLACEMENT
HINT:
- The installation procedures are the removal procedures in reverse order. However, only installation procedures requiring additional information are included.
- A bolt without a torque specification is shown in the standard bolt chart (see page 03-2 ).
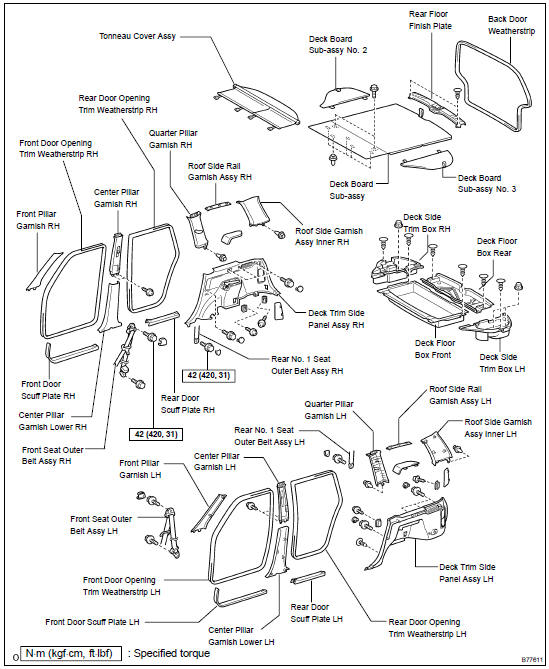
1. REMOVE TONNEAU COVER ASSY
2. REMOVE DECK BOARD SUB-ASSY
(a) Using a screwdriver, disengage the 5 clips, 2 bolts and deck board.
HINT: Tape the screwdriver tip before use.
3. REMOVE DECK BOARD SUB-ASSY NO.2
4. REMOVE DECK BOARD SUB-ASSY NO.3
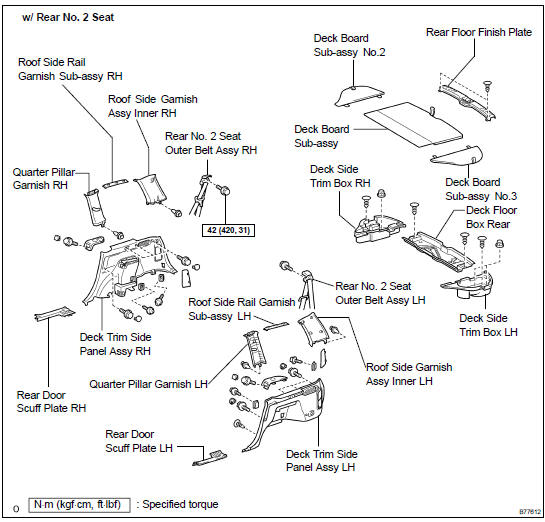
5. REMOVE REAR SEAT RECLINING COVER NO.2 RH (w/ REAR NO. 2 SEAT)

(a) Using a screwdriver, disengage the 2 clips and remove the bolt and cover.
HINT: Tape the screwdriver tip before use.
6. REMOVE REAR SEAT RECLINING COVER NO.2 LH (w/ REAR NO. 2 SEAT)
HINT: Use the same procedures described for the LH side.
7. REMOVE DECK FLOOR BOX REAR
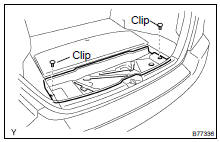
(a) Using a screwdriver, remove the 2 clips and box rear.
HINT: Tape the screwdriver tip before use.
8. REMOVE DECK FLOOR BOX FRONT (w/o REAR NO. 2 SEAT)
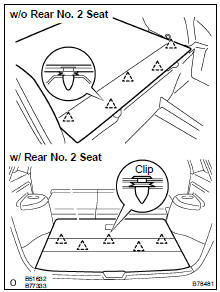
9. REMOVE REAR FLOOR FINISH PLATE
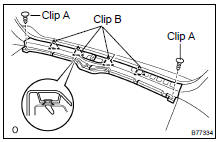
(a) Using a screwdriver, remove the 2 clips labeled A, 4 clips labeled B and finish plate.
HINT: Tape the screwdriver tip before use.
10. REMOVE DECK SIDE TRIM BOX LH
11. REMOVE DECK SIDE TRIM BOX RH
12. REMOVE REAR NO.1 SEAT ASSY LH (See page 72-28 , 72-44 )
13. REMOVE REAR NO.1 SEAT ASSY RH (See page 72-35 , 72-54 )
14. REMOVE REAR NO.2 SEAT ASSEMBLY (w/ REAR NO. 2 SEAT) (See page 72-61 )
15. REMOVE FRONT DOOR SCUFF PLATE LH

(a) Using a screwdriver, disengage the 4 claws labeled A, 2 claws labeled B, claw labeled C and remove the scuff plate.
HINT: Tape the screwdriver tip before use.
16. REMOVE FRONT DOOR SCUFF PLATE RH
HINT: Use the same procedures described for the LH side.
17. REMOVE REAR DOOR SCUFF PLATE LH

(a) Using a screwdriver, disengage the 2 claws and remove the scuff plate.
HINT: Tape the screwdriver tip before use.
18. REMOVE REAR DOOR SCUFF PLATE RH
HINT: Use the same procedures described for the LH side.
19. REMOVE FRONT DOOR OPENING TRIM WEATHERSTRIP LH
20. REMOVE FRONT DOOR OPENING TRIM WEATHERSTRIP RH
21. REMOVE REAR DOOR OPENING TRIM WEATHERSTRIP LH
22. REMOVE REAR DOOR OPENING TRIM WEATHERSTRIP RH
23. REMOVE BACK DOOR WEATHERSTRIP
24. REMOVE CENTER PILLAR GARNISH LOWER LH
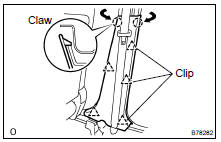
(a) Using a screwdriver, disengage the 2 claws and remove the 5 clips and garnish.
HINT: Tape the screwdriver tip before use.
25. REMOVE CENTER PILLAR GARNISH LOWER RH
HINT: Use the same procedures described for the LH side.
26. REMOVE CENTER PILLAR GARNISH LH
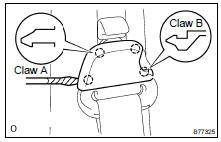
(a) Using a screwdriver, disengage the 2 claws labeled A and 2 claws labeled B, Remove the cover.
HINT: Tape the screwdriver tip before use.
(b) Remove the shoulder anchor bolt.
(c) Remove the 2 screws.
(d) Using a screwdriver, disengage the clip and remove the garnish.
HINT: Tape the screwdriver tip before use.
27. REMOVE CENTER PILLAR GARNISH RH
HINT: Use the same procedures described for the LH side.
28. REMOVE ROPE HOOK
29. REMOVE DECK SIDE TRIM COVER LH
(a) Using a screwdriver, remove the cover and screw.
HINT: Tape the screwdriver tip before use.
(b) Using a screwdriver, disengage the 2 claws and remove the trim box.
HINT: Tape the screwdriver tip before use.
30. REMOVE DECK SIDE TRIM COVER RH
HINT: Use the same procedures described for the LH side.
31. REMOVE DECK TRIM SIDE PANEL ASSY LH
(a) w/o Rear No. 2 seat:
- Remove the 5 bolts and rear seat outer belt floor anchor bolt.
- Using a clip remover, remove the 6 clips and side panel.
(b) w/ Rear No. 2 seat:
- Remove the 5 bolts and rear seat outer belt floor anchor bolt.
- Using a clip remover, remove the 6 clips and side panel.
32. REMOVE DECK TRIM SIDE PANEL ASSY RH
HINT: Use the same procedures described for the LH side.
33. REMOVE QUARTER PILLAR GARNISH LH
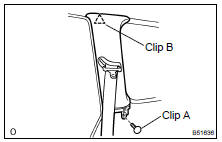
(a) Using a screwdriver, remove the clip labeled A and clip labeled B and garnish.
HINT: Tape the screwdriver tip before use.
34. REMOVE QUARTER PILLAR GARNISH RH
HINT: Use the same procedures described for the LH side.
35. REMOVE ROOF SIDE RAIL GARNISH SUB-ASSY LH
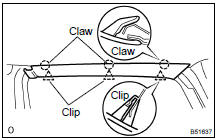
(a) Using a screwdriver, disengage the 3 clips and remove the 3 claws and rail garnish.
HINT: Tape the screwdriver tip before use.
36. REMOVE ROOF SIDE RAIL GARNISH SUB-ASSY RH
HINT: Use the same procedures described for the LH side.
37. REMOVE ROOF SIDE GARNISH ASSY INNER LH
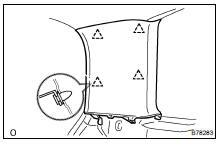
(a) w/o Rear No. 2 seat:
- Using a screwdriver, remove the 4 clips and side garnish.
HINT: Tape the screwdriver tip before use.

b) w/ Rear No. 2 seat:
- Using a screwdriver, remove the 4 clips labeled A, clip labeled B, remove the side garnish.
HINT: Tape the screwdriver tip before use.
38. REMOVE ROOF SIDE GARNISH ASSY INNER RH
HINT: Use the same procedures described for the LH side.
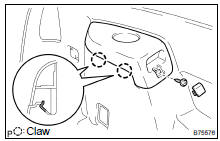
39. REMOVE FRONT PILLAR GARNISH LH
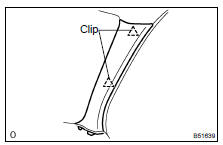
(a) Using a screwdriver, remove the front pillar garnish.
HINT: Tape the screwdriver tip before use.
(b) Pull the garnish upward and remove it from the instrument panel.
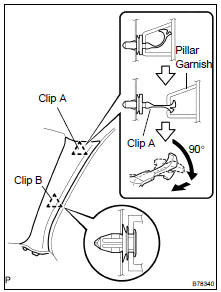
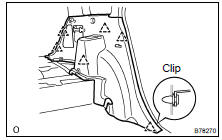
(c) w/ Curtain shield airbag:
- Using a screwdriver, disengage the clips clip labeled A and clip labeled B.
HINT: Tape the screwdriver tip before use.
(d) Remove the pillar garnish.
- Pull the pillar garnish until the clip marked A in the illustration stretches.
- Turn the clip marked A in the illustration 90 degrees and remove the pillar garnish.
HINT: Use the same procedures described for the LH side.
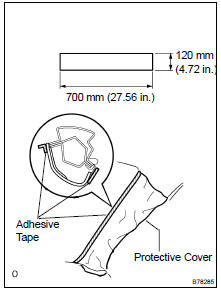
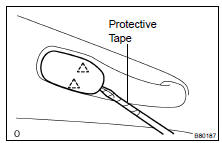
(e) Protect the curtain shield airbag LH.
- Cover the airbag with cloth or a piece of nylon approximately 700 mm (27.56 in.) x 120 mm (4.72 in.) in size. Fix the ends of the cover with tape as shown in the illustration.
NOTICE: Cover the curtain shield airbag with the protective cover as soon as the front pillar garnish is removed.
40. REMOVE FRONT PILLAR GARNISH RH
HINT: Use the same procedures described for the LH side.
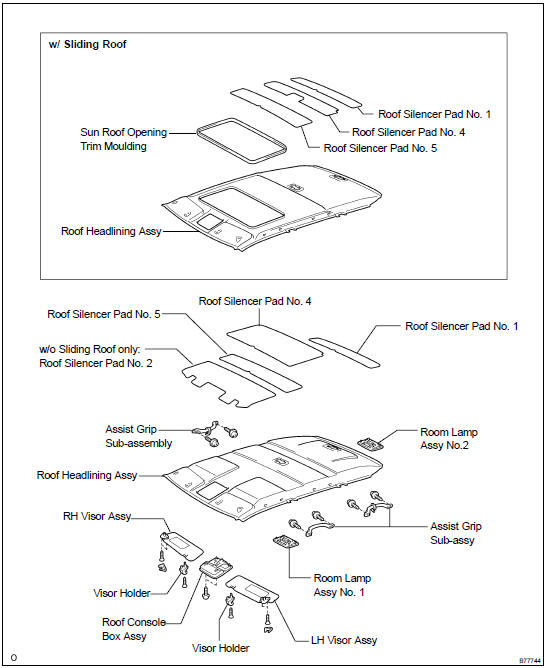
41. REMOVE LH VISOR ASSY
(a) Remove the 2 screws and visor.
42. REMOVE RH VISOR ASSY
(a) Remove the 2 screws and visor.
43. REMOVE ROOF CONSOLE BOX ASSY
(a) Remove the 2 screws.
(b) Using a screwdriver, remove the 2 clips.
HINT: Tape the screwdriver tip before use.
44. REMOVE ROOM LAMP ASSY NO.1
(a) Using a screwdriver, disengage the 2 claws and remove the 2 clips and lamp.
HINT: Tape the screwdriver tip before use.
45. REMOVE ROOM LAMP ASSY NO.2
46. REMOVE ASSIST GRIP SUB-ASSY
(a) Using a screwdriver, remove the assist grip plug.
HINT: Tape the screwdriver tip before use.
(b) Remove the 2 screws and assist grip.
47. REMOVE VISOR HOLDER
(a) Remove the holder of the sun visor by turning it to the left.
48. REMOVE SUN ROOF OPENING TRIM MOULDING
49. REMOVE ROOF HEADLINING ASSY
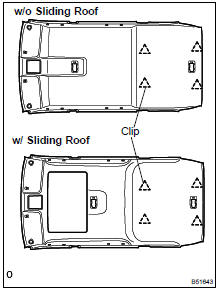
(a) Using a clip remover, remove the 4 clips and roof headlining.
(b) Remove the headlining from the back door.
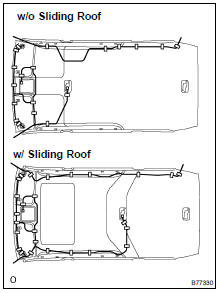
50. REMOVE ROOF SILENCER PAD NO.4
51. REMOVE ROOF SILENCER PAD NO.1
52. REMOVE ROOF SILENCER PAD NO.5
53. REMOVE ROOF SILENCER PAD NO.2 (W/O SLIDING ROOF)
54. INSTALL ROOF HEADLINING ASSY
(a) Align the markings, and then install the wire harness with tape.
NOTICE: Attach the roof wire harness securely.
(b) Install the roof headlining with the 4 clips.
55. INSTALL QUARTER PILLAR GARNISH LH
(a) Install the rear No. 2 seat outer belt shoulder anchor with the bolt.
Torque: 42.0 NVm (420 kgfVcm, 31 ftVlbf)
56. INSTALL QUARTER PILLAR GARNISH RH
HINT: Use the same procedures described for the LH side.
57. INSTALL DECK TRIM SIDE PANEL ASSY LH
(a) Install the rear seat outer belt floor anchor with the bolt.
Torque: 42.0 NVm (420 kgfVcm, 31 ftVlbf)
58. INSTALL DECK TRIM SIDE PANEL ASSY RH
HINT: Use the same procedures described for the LH side.
59. INSTALL CENTER PILLAR GARNISH LH
(a) Install the front seat outer belt shoulder anchor with the bolt.
Torque: 42.0 NVm (420 kgfVcm, 31 ftVlbf)
60. INSTALL CENTER PILLAR GARNISH RH
HINT: Use the same procedures described for the LH side.
 Roof drip side finish moulding center LH
REPLACEMENT
HINT:
The installation is in the reverse order of the removal. However,
when there is a special point concerning
the installation, it is indicated.
On the RH side, use the same ...
 Garage door opener
Garage door opener system ...
More about Toyota Highlander:
On-vehicle inspection
1. INSPECT COOLING SYSTEM FOR LEAKS
(a) Remove the radiator cap.
CAUTION:
Do not remove the radiator cap while the engine and radiator
are still hot. Pressurized, hot engine coolant and steam
may be released and cause serious burns.
(b) Fill the radiator with coolant and attach a radiator ...
