Toyota Highlander Service Manual: Rear wiper motor ASSY
REPLACEMENT
HINT: Installation is in the reverse order of removal.
1. REMOVE RR WIPER ARM & BLADE ASSY
(a) Remove the rear wiper arm cover.
(b) Remove the nut and the RR wiper arm & blade assy.
2. REMOVE REAR WIPER MOTOR GROMMET
3. REMOVE ASSIST STRAP HOLE COVER (SEE PAGE 75-20 )
4. REMOVE ASSIST STRAP ASSY RH (SEE PAGE 75-20 )
5. REMOVE BACK DOOR TRIM PANEL ASSY (SEE PAGE 75-20 )
6. REMOVE REAR WIPER MOTOR ASSY
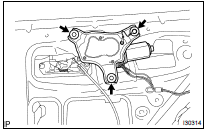
(a) Disconnect the connector.
(b) Remove the 3 bolts and the rear wiper motor assy.
7. INSTALL REAR WIPER MOTOR ASSY
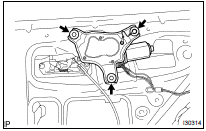
(a) Install the rear wiper motor assy with the 3 bolts.
Torque: 5.5 NVm (56 kgfVcm, 48 in.Vlbf)
(b) Connect the connector.
8. INSTALL REAR WIPER MOTOR GROMMET
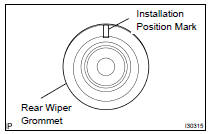
(a) As shown in the illustration, install the rear wiper motor grommet with its position mark upside.
9. INSTALL RR WIPER ARM & BLADE ASSY
(a) Stop the rear wiper motor assy at the automatic stop position.
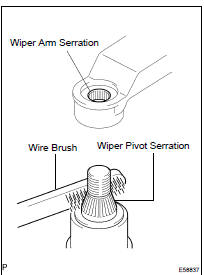
(b) Scrape off the wiper arm serration with a round file or equivalent.
(c) Clean the rear wiper pivot serration with a wire brush.
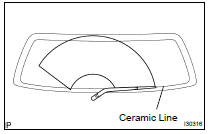
(d) Install the RR wiper arm & blade assy in the position shown in the illustration.
(e) Install the RR wiper arm & blade assy with the nut.
Torque: 5.5 NVm (56 kgfVcm, 48 in.Vlbf)
HINT: Hold down the arm hinge by hand in order to fasten the nut.
(f) Install the rear wiper arm cover.
(g) Operate the wiper while running water or washer fluid over the window, and check the wiping condition and that the rear wiper does not scrape against the body.
 Wiper rubber LH
REPLACEMENT
HINT:
Use the same procedures for the RH side and LH side.
The procedures listed below are for the LH side.
Installation is in the reverse order of removal.
1. REMOVE FR WIPER ...
 Rear wiper rubber
REPLACEMENT
HINT:
Installation is in the reverse order of removal.
1. REMOVE REAR WIPER BLADE ASSY
(a) Raise the rear wiper blade assy to the position where the
claw disengages with a click s ...
More about Toyota Highlander:
Steering wheel audio
switches
Some audio features can be controlled using the switches on
the steering wheel.
Operation may differ depending on the type of audio system or
navigation system. For details, refer to the manual provided with
the audio system or navigation system.
Operating the audio system using the steering ...
