Toyota Highlander Service Manual: Rear wheel alignment
ADJUSTMENT
1. INSPECT TIRE (SEE PAGE 28-1 )
2. MEASURE VEHICLE HEIGHT (SEE PAGE 26-7 )
NOTICE: Before inspecting wheel alignment, adjust the vehicle height to the specified value.
3. INSPECT TOE-IN
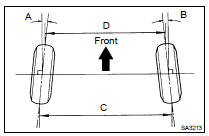
HINT:
- Measure "C - D" only when "A + B" cannot be measured.
- If the toe-in is not within the specified range, inspect the suspension parts and replace them if necessary

4. ADJUST TOE-IN (FF DRIVE TYPE)
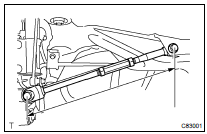
(a) Measure the lengths of the right and left No.2 lower suspension arms.
No. 2 lower suspension arm length difference: 1.5 mm (0.06 in.) or less
If the left-right difference is larger than 1.5 mm (0.06 in.), adjust it by following the procedures below.
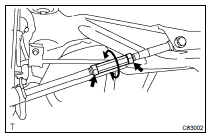
(b) Loosen the 2 lock nuts.
(c) Turn the right and left adjusting tubes by an equal amount to adjust toe-in.
HINT:
- Try to adjust the toe-in to the center value.
- One turn of each adjusting tube will adjust toe-in by approximately 1.1 (1 11'), 11.1mm (0.437 in.).
(d) Torque the 2 lock nuts.
Torque: 56 NVm (570 kgfVcm, 41 ftVlbf)
5. ADJUST TOE-IN (4WD DRIVE TYPE)
(a) Measure the distance between each wheel disc and corner of the toe-adjusting cam, and then confirm that left and right distances are the same.
No. 2 lower suspension arm length difference: 1.0 mm (0.04 in.) or less
If the left-right difference is larger than 1.0 mm (0.04 in.), adjust it by following the procedures below.
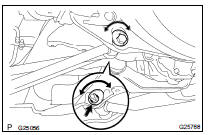
(b) Turn the adjust cams by an equal amount to adjust toe-in.
HINT:
- Try to adjust the toe-in to the center value.
- The toe-in will change by the following specifications corresponding
to each graduation of the cam.
Approx. 3.3 mm (0.13 in.)
(c) Tighten the nut.
Torque: 100 NVm (1,020 kgfVcm, 74 ftVlbf)
6. INSPECT CAMBER

HINT: Camber is not adjustable. If the measurement is not within the specification, inspect the suspension parts for damage and/or wear, and replace them if necessary.
 Rear suspension system
PROBLEM SYMPTOMS TABLE
Use the table below, with suspected areas listed in numerical order, to
determine the cause of the problem.
Inspect and repair or replace parts as necessary according to t ...

More about Toyota Highlander:
Cylinder head gasket (3MZ-FE)
REPLACEMENT
1. WORK FOR PREVENTING GASOLINE FROM SPILLING OUT (See page 11-35 )
2. DRAIN ENGINE COOLANT (See page 16-26 )
3. DRAIN ENGINE OIL
4. REMOVE FR WIPER ARM LH (See page 66-7 )
5. REMOVE FR WIPER ARM RH (See page 66-7 )
6. REMOVE COWL TOP VENTILATOR LOUVER SUB-ASSY (See page 66-7 )
7. ...
