Toyota Highlander Service Manual: Rear NO.2 seat ASSY
COMPONENTS
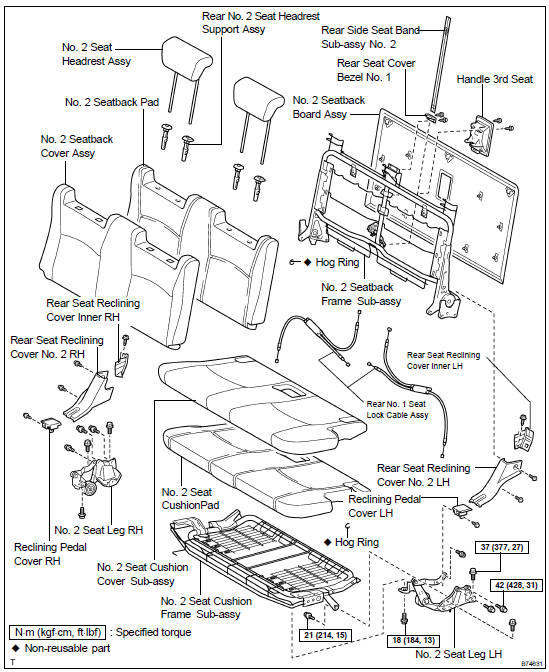
OVERHAUL
HINT:
- The installation procedures are the removal procedures in reverse order. However, only installation procedures requiring additional information are included.
- A bolt without a torque specification is shown in the standard bolt chart (see page 03-2 ).
1. REMOVE TONNEAU COVER ASSY (W/ TONNEAU COVER) (See page 76-21 )
2. REMOVE DECK BOARD SUB-ASSY NO.2 (See page 76-21 )
3. REMOVE DECK BOARD SUB-ASSY NO.3 (See page 76-21 )
4. REMOVE DECK BOARD SUB-ASSY (See page 76-21 )
5. REMOVE DECK FLOOR BOX REAR (See page 76-21 )
6. REMOVE DECK SIDE TRIM BOX LH (See page 76-21 )
7. REMOVE DECK SIDE TRIM BOX RH (See page 76-21 )
8. REMOVE DECK BOARD BRACKET REINFORCEMENT (See page 76-21 )
9. REMOVE RECLINING PEDAL COVER LH
(a) Remove the screw and reclining pedal cover LH.
10. REMOVE RECLINING PEDAL COVER RH
HINT: Use the same procedures described for the LH side.
11. REMOVE REAR SEAT RECLINING COVER NO.2 LH
(a) Remove the 2 screws and rear seat reclining cover No. 2 LH.
12. REMOVE REAR SEAT RECLINING COVER NO.2 RH
HINT: Use the same procedures described for the LH side.
13. REMOVE REAR SEAT RECLINING COVER INNER LH
(a) Remove the screw and rear seat reclining cover inner LH.
14. REMOVE REAR SEAT RECLINING COVER INNER RH
HINT: Use the same procedures described for the LH side.
15. REMOVE REAR NO.2 SEAT ASSY
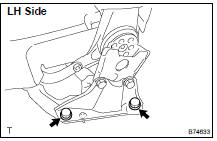
(a) Remove the 4 bolts and rear No. 2 seat.
16. REMOVE REAR NO.2 SEAT LEG LH
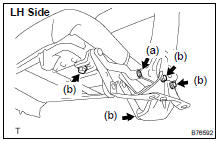
(a) Using a torx) socket wrench (T45), remove the sub seat bolt.
(b) Remove the 4 bolts and rear No. 2 seat leg LH.
17. REMOVE REAR NO.2 SEAT LEG RH
HINT: Use the same procedures described for the LH side.
18. REMOVE NO.2 SEAT CUSHION COVER SUB-ASSY
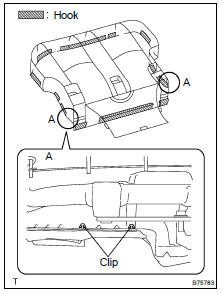
(a) Remove the 4 clips and hook.
(b) Remove the hog rings and seat cushion cover together with the pad from the seat cushion frame.
(c) Remove the hog rings and seat cushion cover from the seat cushion pad.
19. REMOVE REAR SEAT HEADREST ASSY
20. REMOVE HANDLE 3RD SEAT
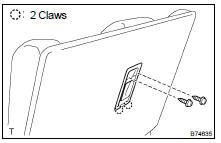
(a) Remove the 2 screws.
(b) Disengage the 2 claws.
(c) Disconnect the rear No. 1 seat cable and remove the handle 3rd seat.
21. REMOVE NO.2 SEATBACK BOARD ASSY
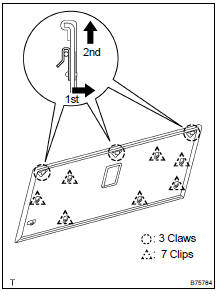
(a) Remove the 7 clips.
(b) Disengage the 3 claws and remove the seatback board.
22. REMOVE NO.2 SEATBACK COVER ASSY
(a) Remove the 2 headrest supports.
(b) Remove the hog rings and seatback cover together with the pad from the seatback frame.
(c) Remove the hog rings and seatback cover from the seatback pad.
23. REMOVE REAR SIDE SEAT BAND SUB-ASSY NO.2
24. REMOVE REAR SEAT COVER BEZEL NO.1
25. REMOVE REAR NO.1 SEAT LOCK CABLE ASSY
26. INSTALL REAR NO.1 SEAT LOCK CABLE ASSY
27. INSTALL REAR SEAT COVER BEZEL NO.1
28. INSTALL REAR SIDE SEAT BAND SUB-ASSY NO.2
29. INSTALL NO.2 SEATBACK COVER ASSY
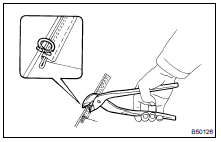
(a) Install the seatback cover to the seatback pad with new hog rings.
(b) Install the seatback cover with the pad to the seatback frame with new hog rings.
HINT: When installing hog rings, take care to prevent wrinkles as little as possible.
30. INSTALL NO.2 SEATBACK BOARD ASSY
31. INSTALL HANDLE 3RD SEAT
32. INSTALL REAR SEAT HEADREST ASSY
33. INSTALL NO.2 SEAT CUSHION COVER SUB-ASSY
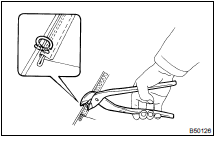
(a) Install the seat cushion cover to the seat cushion pad with new hog rings.
(b) Install the seat cushion cover with the pad to the seat cushion frame with new hog rings.
HINT: When installing the hog rings, take care to prevent wrinkles as much as possible.
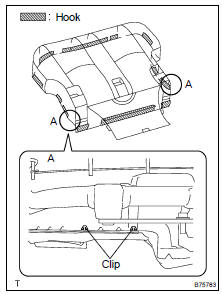
(c) Install the 4 clips and hook.
34. INSTALL REAR NO.2 SEAT LEG LH
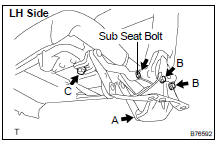
(a) Install the rear No. 2 seat leg LH with the sub seat bolt and 4 bolts.
Torque: 21 NVm (214 kgfVcm, 15 ftVlbf) for bolt A 42 NVm (428 kgfVcm, 31 ftVlbf) for bolt B 18 NVm (184 kgfVcm, 13 ftVlbf) for bolt C 35. INSTALL REAR NO.2 SEAT LEG RH
HINT: Use the same procedures described for the LH side.
36. INSTALL REAR NO.2 SEAT ASSY
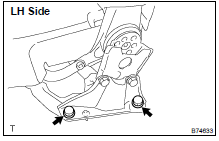
(a) Install the rear No. 2 seat with the 4 bolts.
Torque: 37 NVm (377 kgfVcm, 27 ftVlbf)
 Rear NO.1 Seat ASSY RH (W/rear NO.2 Seat)
COMPONENTS
OVERHAUL
HINT:
The installation procedures are the removal procedures in reverse
order. However, only installation
procedures requiring additional information are included.
...
More about Toyota Highlander:
If you think something
is wrong
If you notice any of the following symptoms, your vehicle probably
needs adjustment or repair. Contact your toyota dealer as
soon as possible.
Visible symptoms
Fluid leaks under the vehicle.
(Water dripping from the air conditioning after use is normal.)
Flat-looking tires or unev ...

