Toyota Highlander Service Manual: Outside moulding
REPLACEMENT
HINT:
- The installation procedures are the removal procedures in reverse order. However, only installation procedures requiring additional information are included.
- Use the same procedures for the RH side and LH side.
1. REMOVE OUTSIDE MOULDING
(a) Using a heat light, heat the body and moulding to 40 to 60 C (104 to 140 F).
NOTICE: Do not heat the body and moulding excessively.
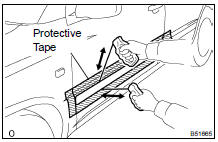
(b) Tie both piano wire ends to a wooden block or a similar object.
(c) Scrape the adhesive tape off by pulling the piano wire as shown in the illustration.
NOTICE:
- If reusing the moulding, take care not to damage the moulding.
- Do not damage the body.
2. INSTALL OUTSIDE MOULDING
(a) Using a heat light, heat the body mounting surface to 40 to 60 C (104 to 140 F).
NOTICE: Do not heat the body excessively.
(b) Remove the protective tape from the body.
(c) Wipe off the stains with cleaner.
(d) Clean the moulding (if reusing the moulding).
- Using a heat light, heat the body and moulding to 20 to 30 C (68 to 86 F).
NOTICE: Do not heat the body and moulding excessively.
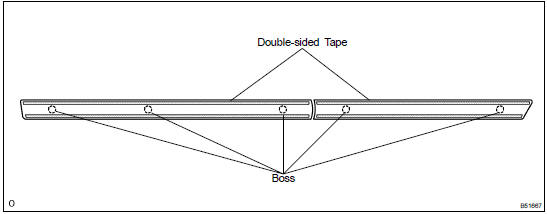
- Remove the double-sided tape from the moulding.
- Wipe off the stains with cleaner.
- Apply new double-sided tape to the moulding as shown in the illustration.
(e) Using a heat light, heat the body and moulding.
Heating temperature:

NOTICE: Do not heat the body and moulding excessively.
(f) Remove the peeling paper from the moulding face.
NOTICE: When the peeling paper is removed, take care that dirt or dust do not stick to the adhesive area.
(g) Attach the moulding securely to the body, as shown in the illustration.
NOTICE: Do not apply excessive force onto the moulding, but steady pressure with your thumbs.
 Luggage compartment door garnish sub-ASSY
outside
Luggage compartment door garnish sub-ASSY
outside
REPLACEMENT
1. REMOVE BACK WINDOW PANEL TRIM UPPER (See page 75-20 )
2. REMOVE BACK DOOR TRIM COVER RH (See page 75-20 )
3. REMOVE BACK DOOR TRIM COVER LH (See page 75-20 )
4. REMOVE BACK DOOR TRI ...
 Roof drip side finish moulding center LH
REPLACEMENT
HINT:
The installation is in the reverse order of the removal. However,
when there is a special point concerning
the installation, it is indicated.
On the RH side, use the same ...
More about Toyota Highlander:
Armrest
Type a
Fold down the armrest for use.
Type b
Lower the armrest from the
highest position to the lowest
position.
Raise the armrest to the
desired angle.
To unlock the armrest, lift the armrest
to raise it to the highest position.
Notice
To prevent d ...
