Toyota Highlander Service Manual: Engine rear oil seal (3MZ-FE)
REPLACEMENT
1. REMOVE AUTOMATIC TRANSAXLE ASSY (2WD TYPE) (See page 40-20 )
2. REMOVE AUTOMATIC TRANSAXLE W/TRANSFER (4WD TYPE) (See page 40-20 )
3. REMOVE DRIVE PLATE & RING GEAR SUB-ASSY
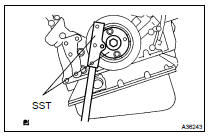
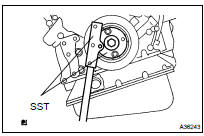
(a) Using SST, hold the crankshaft.
SST 09213-54015 (91651-60855), 09330-00021
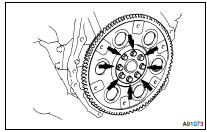
(b) Remove the 8 bolts, the rear spacer, the drive plate and the front spacer.
4. REMOVE ENGINE REAR OIL SEAL
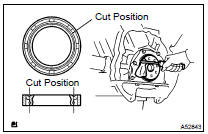
(a) Using a knife, cut off the oil seal lip.
(b) Using a screwdriver with its tip wrapped in tape, pry out the oil seal.
NOTICE: After the removal, check if the crankshaft is not damaged.
If it is damaged, smooth the surface with 400-grit sandpaper.
5. INSTALL ENGINE REAR OIL SEAL
(a) Apply MP grease to a new oil seal lip.
NOTICE: Keep the lip off foreign materials.
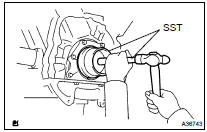
(b) Using SST and a hammer, tap in the oil seal until its surface is flush with the rear oil seal retainer edge.
SST 09223-15030, 09950-70010 (09951-07100)
NOTICE:
- Be careful not to tap the oil seal at an angle.
- Wipe off extra grease from the crankshaft.
6. INSTALL DRIVE PLATE & RING GEAR SUB-ASSY
(a) Using SST, hold the crankshaft.
SST 09213-54015 (91651-60855), 09330-00021 (b) Clean the bolts and bolt holes.
(c) Apply adhesive to 2 or 3 threads of the bolts.
Adhesive: Part No. 08833-00070, THREE BOND 1324 or equivalent
(d) Install the front spacer, the drive plate and the rear spacer on the crankshaft.
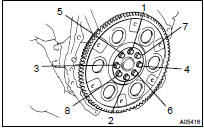
(e) Uniformly install and tighten the 8 bolts in the sequence shown in the illustration.
Torque: 83 NVm (846 kgfVcm, 61 ftVlbf)
NOTICE: Do not start the engine for at least an hour after installing.
7. INSTALL AUTOMATIC TRANSAXLE W/TRANSFER (4WD TYPE) (See page 40-20 )
8. INSTALL AUTOMATIC TRANSAXLE ASSY (2WD TYPE) (See page 40-20 )
 Oil pump seal (3MZ-FE)
REPLACEMENT
1. REMOVE FR WIPER ARM LH (See page 66-7 )
2. REMOVE FR WIPER ARM RH (See page 66-7 )
3. REMOVE COWL TOP VENTILATOR LOUVER SUB-ASSY (See page 66-7 )
4. REMOVE WINDSHIELD WIPER LINK ASS ...
 Cylinder head ASSY (3MZ-FE)
COMPONENTS
...
More about Toyota Highlander:
Thermostat (3MZ-FE)
REPLACEMENT
HINT:
The installation procedures are the removal procedures in reverse order.
However, only installation procedures
requiring additional information are included.
1. DRAIN ENGINE COOLANT (See page 16-26 )
2. REMOVE RADIATOR HOSE OUTLET
3. REMOVE WATER INLET PIPE
(a) Remove the ...
