Toyota Highlander Service Manual: Brake fluid
BLEEDING
HINT: If any work is performed on the brake system or if air in the brake lines is suspected, bleed the air out of the brake system.
NOTICE: Wash brake fluid off immediately if it adheres to any painted surface.
1. FILL RESERVOIR WITH BRAKE FLUID
Fluid: SAE J1703 or FMVSS No. 116 DOT3
2. BLEED MASTER CYLINDER
HINT: If the master cylinder has been disassembled or if the reservoir becomes empty, bleed the air out of the master cylinder.
(a) Using SST, disconnect the brake lines from the master cylinder.
SST 09023-00101
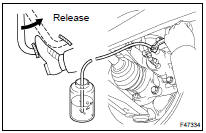
(b) Slowly depress and hold the brake pedal.
(c) Cover the outer holes with your fingers, and release the brake pedal.
(d) Repeat (b) and (c) 3 or 4 times.
(e) Using SST, connect the brake lines from the master cylinder.
SST 09023-00101
Torque: 15 NVm (155 kgfVcm, 11 ftVlbf)
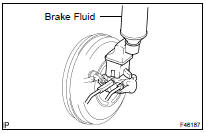
3. BLEED BRAKE LINE
(a) Connect the vinyl tube to the bleeder plug.
(b) Depress the brake pedal several times, then loosen the bleeder plug with the pedal depressed.
(c) At the point when fluid stops coming out, tighten the bleeder plug, then release the brake pedal.
(d) Repeat (b) and (c) until all the air in the fluid is completely bled out.
(e) Tighten the bleeder plug completely.
Torque: 8.3 NVm (85 kgfVcm, 73 in.Vlbf)
(f) Repeat the previous procedures for each wheel to bleed the air out of the brake line.
4. BLEED BRAKE ACTUATOR ASSY
NOTICE: After bleeding the air from the brake system, if the height or feel of the brake pedal cannot be obtained, perform air bleeding in the brake actuator assy with a hand-held tester by following the procedures below.
(a) Depress the brake pedal more than 20 times with the engine off.
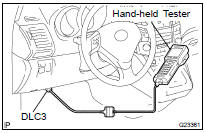
(b) Connect the hand-held tester to the DLC3, then turn the ignition switch to the ON position.
NOTICE: Do not start the engine.
(c) Select "AIR BLEEDING" on the hand-held tester.
HINT: Please refer to the hand-held tester operator's manual for further details.
(d) Bleed the air out of the regular brake line when "Step 1: Increase" appears on the hand-held tester display.
NOTICE:
- Bleed the air by follo
- ing the steps displayed on the
hand-held tester.
Make sure that the brake fluid in the master cylinder reservoir tank does not become empty.
- Connect the vinyl tube to either one of the bleeder plugs.
- Depress the brake pedal several times, then loosen the bleeder plug connected to the vinyl tube with the pedal depressed.
- ) When fluid stops coming out, tighten the bleeder plug and release the brake pedal.
- Repeat (2) and (3) until all the air in the fluid is completely bled out.
- Tighten the bleeder plug completely.
Torque: 8.3 NVm (85 kgfVcm, 73 in.Vlbf)
- Repeat the above procedures for each wheel to bleed the air out of the brake line.
(e) Bleed the air out of the suction line when "Step 2: Inhalation" appears on the hand-held tester display.
NOTICE:
- Bleed the air by following the steps displayed on the hand-held tester.
- Make sure that the brake fluid in the master cylinder reservoir tank does not become empty.
- Connect the vinyl tube to the bleeder plug at the right front wheel or the right rear wheel and loosen the bleeder plug.
- Operate the brake actuator assy to bleed the air using the hand-held tester.
NOTICE: This operation stops automatically after 4 seconds.
At this time, be sure to release the brake pedal.
- Check if the operation has stopped by referring to the hand-held tester display.
- Repeat (2) and (3) until all air in the fluid is completely bled out.
- Tighten the bleeder plug completely.
Torque: 8.3 NVm (85 kgfVcm, 73 in.Vlbf)
- Repeat the above procedures to bleed the air out of the brake line for each wheel.
(f) Bleed the air out of the pressure reduction line when "Step 3: Decrease" appears on the hand-held tester display.
NOTICE:
- Bleed the air by following the steps displayed on the hand-held tester.
- Make sure that the brake fluid in the master cylinder reservoir tank does not become empty.
- Connect a vinyl tube to either one of the bleeder plugs.
- Loosen the bleeder plug.
- Using the hand-held tester, operate the brake actuator assy, completely depress the brake pedal and keep it.
NOTICE:
- The operation stops automatically after 4 seconds.
When performing this procedure continuously, set an interval of at least 20 seconds.
- When the operation is complete, the brake pedal goes down slightly. This is a nomal phenomenon caused when the solenoid opens.
- During this procedure, the pedal will feel heavy, but completely depress it so that the brake fluid comes out from the bleeder plug.
- Be sure to keep depressing the brake pedal. Do not depress and release the pedal repeatedly.
- Tighten the bleeder plug, then release the brake pedal.
- Repeat (2) to (4) until all the air in the fluid is completely bled out.
- Tighten the bleeder plug completely.
Torque: 8.3 NVm (85 kgfVcm, 73 in.Vlbf)
- Repeat the above procedures for each wheel to bleed the air out of the brake line.
(g) Bleed the air out of the regular brake line again when "Step 4: Increase" appears on the hand-held tester display.
NOTICE:
- Bleed the air by following the steps displayed on the hand-held tester.
- Make sure that the brake fluid in the master cylinder reservoir tank does not become empty.
(1) Connect the vinyl tube to either one of the bleeder plugs.
- Depress the brake pedal several times, then loosen the bleeder plug connected to the vinyl tube with the pedal depressed.
- When fluid stops coming out, tighten the bleeder plug, then release the brake pedal.
- Repeat (2) and (3) until all the air in the fluid is completely bled out.
- Tighten the bleeder plug completely.
Torque: 8.3 NVm (85 kgfVcm, 73 in.Vlbf)
- Repeat the above procedures for each wheel to bleed the air out of the brake line.
5. CHECK FLUID LEVEL IN RESERVOIR
(a) Check the fluid level and add fluid if necessary.
Fluid: SAE J1703 or FMVSS No. 116 DOT3
 Brake system
PRECAUTION
NOTICE:
Care must be taken to replace each part properly as it could affect
the performance of the brake
system and result in a driving hazard. Replace the parts with parts having ...
 Brake pedal sub-assy
ADJUSTMENT
1. CHECK AND ADJUST BRAKE PEDAL HEIGHT
(a) Check brake pedal height.
Pedal height from asphalt sheet:
150 to 160 mm (5.906 to 6.299 in.)
(b) Adjust brake pedal height.
Di ...
More about Toyota Highlander:
Installing child restraints using a seat belt (child restraint lock
function belt)
Rear-facing - infant seat/convertible seat
Adjusting the seat
Second seats
Fold the seatback while pulling
the lever. Return the
seatback and secure it at the
1st lock position (most
upright position).
Move the seat as far back as
possible.
Third seats
Fold the seatb ...
