Toyota Highlander Service Manual: Rear suspension arm ASSY NO.1 LH (4WD)
REPLACEMENT
HINT: COMPONENTS: See page 27-2 .
1. REMOVE REAR WHEEL
2. REMOVE EXHAUST PIPE ASSY
(a) 2AZ-FE (see page 15-2 ) (b) 3MZ-FE (see page 15-5 )
3. REMOVE PROPELLER W/CENTER BEARING SHAFT ASSY (SEE PAGE 30-12 ) SST 09325-20010
4. REMOVE STRUT ROD ASSY REAR (SEE PAGE 27-13 )
5. SEPARATE REAR SUSPENSION ARM ASSY NO.2 LH
(a) Remove the bolt, nut and the rear suspension arm assy No.2 (outer side) from the rear axle carrier.
NOTICE: When removing the bolt, keep the nut from rotating.
6. SEPARATE REAR SUSPENSION ARM ASSY NO.2 RH
HINT: Separate the RH side using the same procedures as for the LH side.
7. SEPARATE REAR SUSPENSION ARM ASSY NO.1 LH
(a) Remove the bolt, nut and the rear suspension arm assy No.1 (outer side) from the rear axle carrier.
NOTICE: When removing the bolt, keep the nut from rotating.
8. SEPARATE REAR SUSPENSION ARM ASSY NO.1 RH
HINT: Separate the RH side using the same procedures as for the LH side.
9. REMOVE SPEED SENSOR REAR LH (SEE PAGE 30-60 )
10. REMOVE SPEED SENSOR REAR RH
HINT: Remove the RH side using the same procedures as for the LH side.
11. REMOVE REAR DRIVE SHAFT ASSY LH (SEE PAGE 30-45 )
12. REMOVE REAR DRIVE SHAFT ASSY RH
HINT: Remove the RH side using the same procedures as for the LH side.
13. REMOVE REAR SUSPENSION MEMBER SUB-ASSY
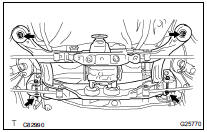
(a) Support the rear suspension member with a jack.
(b) Remove the 4 nuts, 2 bolts and 2 retainers from the rear suspension member.
(c) Lower the rear suspension member.
14. REMOVE REAR SUSPENSION ARM ASSY NO.1 LH
(a) Remove the bolt, nut and rear suspension arm assy No.1.
NOTICE: When removing the bolt, keep the nut from rotating.
15. INSTALL REAR SUSPENSION ARM ASSY NO.1 LH
(a) Install the rear suspension arm assy No.1 with the bolt and nut, and temporarily tighten the bolt.
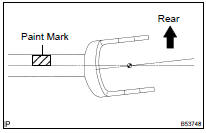
HINT: Ensure that the paint mark on the rear suspension arm assy No.1 faces the rear side of the vehicle.
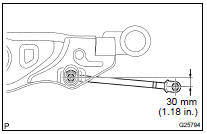
(b) Set the rear suspension arm assy No.1 in the position shown in the illustration, and fully tighten the bolt.
Torque: 80 NVm (816 kgfVcm, 59 ftVlbf)
16. INSTALL REAR SUSPENSION MEMBER SUB-ASSY

(a) Raise the rear suspension member with a jack.
(b) Install the rear suspension member with the 4 nuts, 2 bolts and 2 retainers.
Torque: Front side: 115 NVm (1,170 kgfVcm, 85 ftVlbf) Rear side: 181 NVm (1,850 kgfVcm, 134 ftVlbf)
17. INSTALL REAR DRIVE SHAFT ASSY LH (SEE PAGE 30-45 )
18. INSTALL REAR DRIVE SHAFT ASSY RH
HINT: Install the RH side using the same procedures as for the LH side.
19. INSTALL SPEED SENSOR REAR LH (SEE PAGE 30-60 )
20. INSTALL SPEED SENSOR REAR RH
HINT: Install the RH side using the same procedures as for the LH side.
21. TEMPORARILY TIGHTEN REAR SUSPENSION ARM ASSY NO.1 LH
(a) Install the rear suspension arm assy No.1 (outer side) to the rear axle carrier, and temporarily tighten the bolt.
NOTICE: When installing the bolt, fix the nut and temporarily tighten the bolt.
22. TEMPORARILY TIGHTEN REAR SUSPENSION ARM ASSY NO.1 RH
HINT: Temporarily tighten the RH side using the same procedures as for the LH side.
23. TEMPORARILY TIGHTEN REAR SUSPENSION ARM ASSY NO.2 LH
(a) Install the rear suspension arm No. 2 (outer side) to the rear axle carrier, and temporarily tighten the bolt.
NOTICE: When installing the bolt, fix the nut and temporarily tighten the bolt.
24. TEMPORARILY TIGHTEN REAR SUSPENSION ARM ASSY NO.2 RH
HINT: Temporarily tighten the RH side using the same procedures as for the LH side.
25. TEMPORARILY TIGHTEN STRUT ROD ASSY REAR (SEE PAGE 27-13 )
26. STABILIZE SUSPENSION (SEE PAGE 27-13 )
27. FULLY TIGHTEN REAR SUSPENSION ARM ASSY NO.1 LH
(a) Fully tighten the bolt.
Torque: 112 NVm (1,140 kgfVcm, 83 ftVlbf)
28. FULLY TIGHTEN REAR SUSPENSION ARM ASSY NO.1 RH
HINT: Fully tighten the RH side using the same procedures as for the LH side.
29. FULLY TIGHTEN REAR SUSPENSION ARM ASSY NO.2 LH
(a) Fully tighten the bolt.
Torque: 112 NVm (1,140 kgfVcm, 83 ftVlbf)
30. FULLY TIGHTEN REAR SUSPENSION ARM ASSY NO.2 RH
HINT: Fully tighten the RH side using the same procedures as for the LH side.
31. FULLY TIGHTEN STRUT ROD ASSY REAR (SEE PAGE 27-13 )
32. INSTALL REAR WHEEL Torque: 103 NVm (1,050 kgfVcm, 76 ftVlbf)
33. TEMPORARILY TIGHTEN PROPELLER W/CENTER BEARING SHAFT ASSY (SEE PAGE 30-12 )
34. FULLY TIGHTEN PROPELLER W/CENTER BEARING SHAFT ASSY (SEE PAGE 30-12 )
35. INSTALL EXHAUST PIPE ASSY
(a) 2AZ-FE (see page 15-2 ) (b) 3MZ-FE (see page 15-5 )
36. CHECK FOR EXHAUST GAS LEAKS
37. INSPECT REAR WHEEL ALIGNMENT (SEE PAGE 27-5 )
38. CHECK ABS SPEED SENSOR SIGNAL (SEE PAGE 05-765 )
 Rear suspension arm ASSY NO.1 LH (FF)
REPLACEMENT
HINT:
COMPONENTS: See page 27-2 .
1. REMOVE REAR WHEEL
2. REMOVE STABILIZER BAR REAR (SEE PAGE 27-27 )
3. REMOVE REAR SUSPENSION ARM ASSY NO.1 LH
(a) Support the rear axle carrie ...
 Rear suspension arm ASSY NO.2 LH (FF)
REPLACEMENT
HINT:
COMPONENTS: See page 27-2 .
1. REMOVE REAR WHEEL
2. REMOVE REAR SUSPENSION ARM ASSY NO.2 LH
(a) Support the rear axle carrier with a jack.
(b) Remove the bolt, and disconne ...
More about Toyota Highlander:
Vehicle control system
Ignition switch
PROBLEM SYMPTOMS TABLE
Symptom
Suspected Area
Ignition switch is not set in each position
Ignition switch
Power source circuit
INSPECTION
1. INSPECT IGNITION OR STARTER SWITCH ASSY
(a) Inspect the ignition switch contin ...
