Toyota Highlander Service Manual: Overhaul
1. DISCONNECT CABLE FROM NEGATIVE BATTERY TERMINAL
2. REMOVE ROOF HEADLINING ASSY (See page 76-21 )
3. REMOVE SLIDING ROOF SIDE GARNISH RH

(a) Using a screwdriver, detach the 4 claws and remove the garnish.
HINT: Tape the screwdriver tip before use.
4. REMOVE SLIDING ROOF SIDE GARNISH LH
HINT: Use the same procedures described for the RH side.
5. REMOVE SLIDING ROOF GLASS SUB-ASSY
(a) Using a T25 "torx" driver, remove the 4 screws and glass.
(b) Pull the glass upward to remove it.
6. DISCONNECT SLIDING ROOF DRAIN HOSE

(a) Disconnect the 4 drain hoses.
7. REMOVE CURTAIN SHIELD AIRBAG RH (w/ Curtain Shield Airbag) (See page 60-38 )
8. REMOVE CURTAIN SHIELD AIRBAG LH (w/ Curtain Shield Airbag) (See page 60-38 )
9. REMOVE FRONT SIDE RAIL SPACER RH (w/o Curtain Shield Airbag)
(a) Detach the 3 claws and remove the rail spacer.
10. REMOVE FRONT SIDE RAIL SPACER LH (w/o Curtain Shield Airbag)
HINT: Use the same procedures described for the RH side.
11. REMOVE REAR SIDE RAIL SPACER RH (w/o Curtain Shield Airbag)
(a) Detach the 4 claws and remove the rail spacer.
12. REMOVE REAR SIDE RAIL SPACER LH (w/o Curtain Shield Airbag)
HINT: Use the same procedures described for the RH side.
13. REMOVE SLIDING ROOF HOUSING FRONT MOUNTING BRACKET RH
(a) Remove the 2 bolts and bracket.
14. REMOVE SLIDING ROOF HOUSING FRONT MOUNTING BRACKET LH
HINT: Use the same procedures described for the RH side.
15. REMOVE SLIDING ROOF HOUSING CENTER MOUNTING BRACKET RH
(a) Remove the 2 bolts and bracket.
16. REMOVE SLIDING ROOF HOUSING CENTER MOUNTING BRACKET LH
HINT: Use the same procedures described for the RH side.
17. REMOVE SLIDING ROOF HOUSING SUB-ASSY
(a) Disconnect the drive gear connector.
(b) Remove the 8 nuts and roof housing.
18. REMOVE SLIDING ROOF DRIVE GEAR SUB-ASSY
(a) Remove the bracket.
(b) Remove the 2 bolts and drive gear.
19. REMOVE SUNSHADE TRIM SUB-ASSY
(a) Remove the 2 stoppers.
(b) Slide and remove the sunshade trim.
20. REMOVE ROOF WIND DEFLECTOR PANEL SUB-ASSY
(a) Using a screwdriver, slide the drive cable.
(b) Detach the claw, and remove the deflector panel.
21. REMOVE SLIDING ROOF HOUSING PANEL
(a) Remove the screw and housing panel.
22. REMOVE SLIDING ROOF DRIVE CABLE
(a) Using a screwdriver, slide the drive cables backward and remove them.
HINT: Tape the screwdriver tip before use.
23. INSTALL SLIDING ROOF DRIVE CABLE
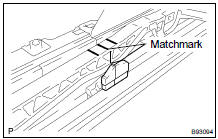
24. ADJUST FULLY CLOSED POSITION
(a) Using a screwdriver, slide the sliding roof drive cable LH and RH to align the matchmaks.
HINT:Tape the screwdriver tip before use.
25. INSTALL SLIDING ROOF HOUSING PANEL
(a) Engage the 2 claws.
(b) Install the housing panel with the 2 screws.
Torque: 5.5 NVm (56 kgfVcm, 49 in.Vlbf)
26. INSTALL ROOF WIND DEFLECTOR PANEL SUB-ASSY
(a) Engage the claw, and install the deflector panel.
27. INSTALL SUNSHADE TRIM SUB-ASSY
(a) Insert the sunshade trim into the sliding roof housing.
(b) Install the 2 stoppers.
28. INSTALL SLIDING ROOF DRIVE GEAR SUB-ASSY
(a) Install the drive gear with the 2 bolts.
Torque: 5.4 NVm (55 kgfVcm, 48 in.Vlbf)
(b) Install the bracket to the drive gear.
29. INSTALL SLIDING ROOF HOUSING SUB-ASSY
(a) Install the roof housing with the 8 nuts.
Torque: 5.5 NVm (56 kgfVcm, 49 in.Vlbf)
(b) Connect the drive gear connector.
30. INSTALL SLIDING ROOF HOUSING CENTER MOUNTING BRACKET RH
(a) Install the bracket with the 2 bolts.
Torque: 8.0 NVm (82 kgfVcm, 71 in.Vlbf)
31. INSTALL SLIDING ROOF HOUSING CENTER MOUNTING BRACKET LH
HINT: Use the same procedures described for the RH side.
32. INSTALL SLIDING ROOF HOUSING FRONT MOUNTING BRACKET RH
(a) Install the bracket with the 2 bolts.
Torque: 8.0 NVm (82 kgfVcm, 71 in.Vlbf)
33. INSTALL SLIDING ROOF HOUSING FRONT MOUNTING BRACKET LH
HINT: Use the same procedures described for the RH side.
34. CONNECT SLIDING ROOF DRAIN HOSE
(a) Connect the 4 drain hoses.
35. INSTALL SLIDING ROOF GLASS SUB-ASSY
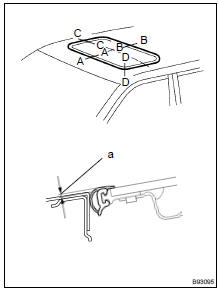
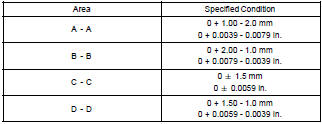
(a) Using a T25 "torx driver, temporarily install the sliding roof glass with the 4 screws." (b) Perform a level check.
Check the difference in level for "a" between the roof panel and the upper surface of the weatherstrip when the sliding roof glass is fully closed.
Standard measurement
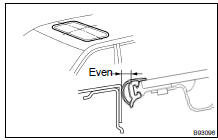
(c) Perform a gap check.
Check the gap between the roof panel and roof glass.
NOTICE: The gap must be even all around.
(d) Using a T25 "torx" driver, install the sliding roof glass with the 4 screws.
36. INSTALL SLIDING ROOF SIDE GARNISH RH
(a) Attach the 4 claws to install the garnish.
37. INSTALL SLIDING ROOF SIDE GARNISH LH
HINT: Use the same procedures described for the RH side.
38. CHECK FOR WATER LEAKS
(a) Adjust the sliding roof glass, and check for water leaks.
(b) If there are any leaks, readjust the sliding roof glass.
39. INSTALL REAR SIDE RAIL SPACER RH (w/o Curtain Shield Airbag)
(a) Attach the 4 claws to install the rail spacer.
40. INSTALL REAR SIDE RAIL SPACER LH (w/o Curtain Shield Airbag)
HINT: Use the same procedures described for the RH side.
41. INSTALL FRONT SIDE RAIL SPACER RH (w/o Curtain Shield Airbag)
(a) Attach the 3 claws to install rail spacer.
42. INSTALL FRONT SIDE RAIL SPACER LH (w/o Curtain Shield Airbag)
HINT: Use the same procedures described for the RH side.
43. INSTALL CURTAIN SHIELD AIRBAG RH (w/ Curtain Shield Airbag) (See page 60-38 )
44. INSTALL CURTAIN SHIELD AIRBAG LH (w/ Curtain Shield Airbag) (See page 60-38 )
45. INSTALL ROOF HEADLINING ASSY (See page 76-21 )
46. CABLE TO NEGATIVE BATTERY TERMINAL
 Components
...
 Engine hood/door
...
More about Toyota Highlander:
Power steering link ASSY
COMPONENTS
OVERHAUL
NOTICE:
When installing ,coat the parts indicated by arrows with power steering fluid or
molybdenum disulfide
lithium base grease (see page 51-25 ).
1. INSPECT CENTER FRONT WHEEL
2. REMOVE FRONT WHEEL
3. SEPARATE TIE ROD ASSY LH (SEE PAGE 30-21 )
SST 09628-6201 ...
