Toyota Highlander Service Manual: Overhaul
1. REMOVE MAGNETIC SWITCH ASSY
(a) Remove the nut and disconnect the lead wire from the magnetic switch.
(b) Remove the 2 screws holding the magnetic switch to the starter drive housing.
(c) Remove the magnetic switch.
(d) Remove the return spring and plunger from the drive housing.
2. REMOVE STARTER YOKE ASSY
(a) Remove the 2 through bolts, and pull out the yoke together with the commutator end frame.
(b) Remove the yoke from the commutator end frame.
3. REMOVE STARTER AMATURE PLATE

(a) Remove the armature plate from the yoke.
4. REMOVE STARTER COMMUTATOR END FRAME COVER
(a) Using a screwdriver, remove the frame cover.
5. REMOVE STARTER ARMATURE ASSY
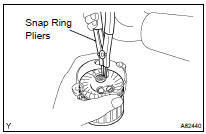
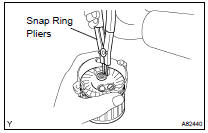
(a) Using snap ring pliers, remove the snap ring and plate washer.
(b) Remove the armature from the commutator end frame.
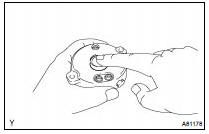
6. REMOVE PLANETARY GEAR
(a) Remove the 3 planetary gears from the drive housing.
7. INSPECT MAGNETIC SWITCH ASSY
(a) Check the plunger.
- Push in the plunger and check that it returns quickly to its original position.
If necessary, replace the magnetic switch assy.
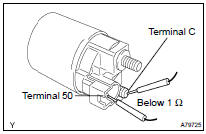
(b) Check if the pull-in coil has an open circuit.
- Check the resistance between terminals 50 and C.
Standard: Below 1 W
If the result is not as specified, replace the magnetic switch assy.
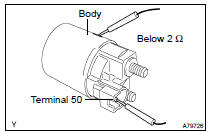
(c) Check if the hold-in coil has an open circuit.
- Check the resistance between terminal 50 and the switch body.
Standard: Below 2 W
If the result is not as specified, replace the magnetic switch assy.
8. INSPECT STARTER ARMATURE ASSY
(a) Check the commutator for contamination and burns on its surface.
If the surface is dirty or burnt, correct it with sandpaper (No. 400) or a lathe.
(b) Check if the commutator has an open circuit.
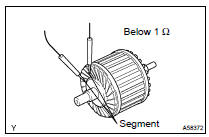
- Check the resistance between the segments of the commutator.
Standard: Below 1 W
If the result is not as specified, replace the armature assy.
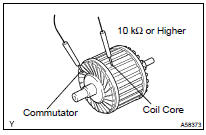
(c) Check if the commutator is grounded.
- Check the resistance between the commutator and armature coil core.
Standard: 10 kW or higher
If the result is not as specified, replace the armature assy.
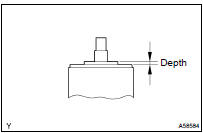
(d) Using a vernier caliper, measure the commutator's depth.
Specified depth: 3.1 mm (0.122 in.) Maximum depth: 3.8 mm (0.150 in.)
If the depth is greater than the maximum, replace the starter armature.
9. INSPECT STARTER COMMUTATOR END FRAME ASSY
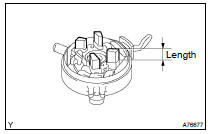
(a) Using a vernier caliper, measure the brush length.
Standard length: 9.0 mm (0.354 in.) Minimum length: 4.0 mm (0.157 in.)
If the length is less than the minimum, replace the end frame assy.
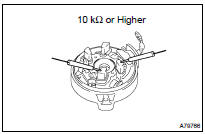
(b) Check the brush insulation.
- Check the resistance between the positive (+) and negative (-) brush.
Standard: 10 kW or higher
If the result is not as specified, repair or replace the end frame assy.
10. INSPECT STARTER DRIVE HOUSING ASSY
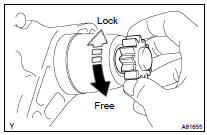
(a) Check the starter clutch.
- Rotate the clutch pinion gear counterclockwise and check that it turns freely. Try to rotate the clutch pinion gear clockwise and check that it locks.
If necessary, replace the drive housing assy.
11. INSTALL PLANETARY GEAR

(a) Apply grease to the planetary gears and pin parts of the planetary shaft.
(b) Install the 3 planetary gears.
12. INSTALL STARTER ARMATURE ASSY
(a) Apply grease to the plate washer and the armature shaft.
(b) Install the armature to the starter commutator end frame.
(c) Using snap ring pliers, install the plate washer and a new snap ring.
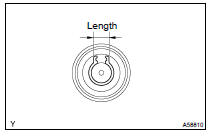
(d) Using a vernier caliper, measure the length of the snap ring.
Maximum length: 5.0 mm (0.197 in.)
If the length is greater than the maximum, replace it with a new snap ring.
13. INSTALL STARTER COMMUTATOR END FRAME COVER
(a) Install the end frame cover to the commutator end frame.
14. INSTALL STARTER ARMATURE PLATE
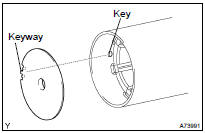
(a) Align the keyway of the starter plate with the key inside the field frame, and install the plate.
15. INSTALL STARTER COMMUTATOR END FRAME ASSY
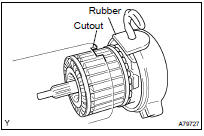
(a) Align the rubber of the end frame with the cutout of the yoke.
(b) Install the end frame to the yoke.
16. INSTALL STARTER YOKE ASSY
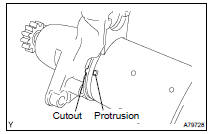
(a) Align the protrusion of the yoke with the cutout of the drive housing.
(b) Install the yoke with the 2 through bolts.
Torque: 6.0 NVm (61 kgfVcm, 53 in.Vlbf)
17. INSTALL MAGNETIC SWITCH ASSY
(a) Apply grease to the plunger and the hook.
(b) Hang the plunger hook of the magnetic switch to the drive lever.
(c) Install the plunger and return spring.
(d) Install the magnetic switch with the 2 screws.
Torque: 7.5 NVm (76 kgfVcm, 66 in.Vlbf)
(e) Connect the lead wire to the magnetic switch with the nut.
Torque: 10 NVm (102 kgfVcm, 7 ftVlbf)
 Replacement
NOTICE:
Before changing the starter, check the following again:
Connector connection
Accessory installation
1. REMOVE BATTERY
2. REMOVE BATTERY TRAY
3. REMOVE STARTER ASSY
(a) Disconn ...
 Charging system (2AZ-FE)
PRECAUTION
CAUTION:
Check that the battery cables are connected to the correct terminals.
Disconnect the battery cables when the battery is given a quick
charge.
Do not perform tests with ...
More about Toyota Highlander:
Air bag sensor rear LH
COMPONENTS
REPLACEMENT
HINT:
Use the same procedures for the RH side and LH side.
The procedures listed below are for the LH side.
Installation is in the reverse order of removal.
1. PRECAUTION (SEE PAGE 60-1 )
2. DISCONNECT BATTERY NEGATIVE TERMINAL (SEE PAGE 60-1 )
3. REMOVE TONNE ...
