Toyota Highlander Service Manual: Multi-display controller sub-ASSY
REPLACEMENT
HINT:
- COMPONENTS: See page 67-2
- Installation is in the reverse order of removal.
1. REMOVE REAR SEAT ASSY RH (SEE PAGE 72-35 )
2. REMOVE REAR SEAT ASSY LH (SEE PAGE 72-28 )
3. REMOVE REAR DOOR SCUFF PLATE RH (SEE PAGE 76-21 )
4. REMOVE REAR DOOR SCUFF PLATE LH (SEE PAGE 76-21 )
5. REMOVE REAR DOOR OPENING TRIM WEATHERSTRIP RH (SEE PAGE 76-21 )
6. REMOVE REAR DOOR OPENING TRIM WEATHERSTRIP LH (SEE PAGE 76-21 )
7. REMOVE TONNEAU COVER ASSY (SEE PAGE 76-21 )
8. REMOVE DECK BOARD SUB-ASSY (SEE PAGE 76-21 )
9. REMOVE DECK BOARD SUB-ASSY NO.2 (SEE PAGE 76-21 )
10. REMOVE DECK BOARD SUB-ASSY NO.3 (SEE PAGE 76-21 )
11. REMOVE DECK SIDE TRIM BOX RH (SEE PAGE 76-21 )
12. REMOVE DECK SIDE TRIM BOX LH (SEE PAGE 76-21 )
13. REMOVE REAR FLOOR FINISH PLATE (SEE PAGE 76-21 )
14. REMOVE DECK TRIM SIDE PANEL ASSY RH (SEE PAGE 76-21 )
15. REMOVE DECK TRIM SIDE PANEL ASSY LH (SEE PAGE 76-21 )
16. REMOVE REAR SEAT SUB FLOOR PANEL ASSY (W/O RR NO.2 SEAT)
(a) Remove the 3 bolts, 3 nuts and rear seat sub floor panel.
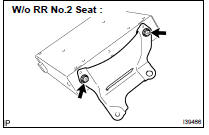
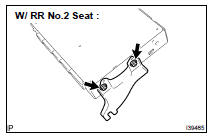
17. REMOVE MULTI- DISPLAY CONTROLLER W/BRACKET
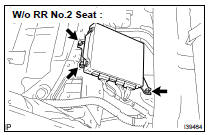
(a) Disconnect the connectors.
(b) W/o RR No.2 Seat: Remove the 2 bolts and nut and the multi-display controller w/bracket.
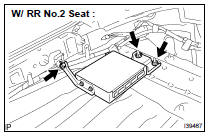
(c) W/ RR No.2 Seat: Remove the 2 nuts and bolt and the multi-display controller w/bracket.
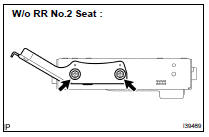
18. REMOVE MULTI-DISPLA Y CONTROLER BRACKET A
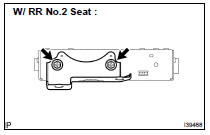
(a) Remove the 2 screws and the multi-display controller bracket A.
19. REMOVE MULTI-DISPLA Y CONTROLER BRACKET B
(a) Remove the 2 screws and the multi-display controller bracket B.
20. REMOVE MULTI-DISPLA Y CONTROLLER SUB-ASSY
 Voltage inverter ASSY
REPLACEMENT
HINT:
COMPONENTS: See page 67-2
Installation is in the reverse order of removal.
1. REMOVE INSTRUMENT CLUSTER FINISH PANEL ASSY CENTER (SEE PAGE 71-10 )
2. REMOVE FRONT SEAT ARM ...
 Television display ASSY
REPLACEMENT
HINT:
COMPONENTS: See page 67-2
Installation is in the reverse order of removal.
1. REMOVE TELEVISION BASE
(a) Release the 4 claws and remove the television base.
2. REMOVE ...
More about Toyota Highlander:
Vehicle control system
Ignition switch
PROBLEM SYMPTOMS TABLE
Symptom
Suspected Area
Ignition switch is not set in each position
Ignition switch
Power source circuit
INSPECTION
1. INSPECT IGNITION OR STARTER SWITCH ASSY
(a) Inspect the ignition switch contin ...
