Toyota Highlander Service Manual: Replacement
HINT: Installation is in the reverse order of removal.
1. PRECAUTION (SEE PAGE 60-1 )
2. DISCONNECT BATTERY NEGATIVE TERMINAL (SEE PAGE 60-1 )
3. REMOVE GLOVE COMPARTMENT DOOR ASSY (SEE PAGE 71-10 )
4. REMOVE INSTRUMENT PANEL FINISH PANEL LOWER NO.2 (SEE PAGE 71-10 )
5. DISCONNECT FRONT PASSENGER AIRBAG ASSY CONNECTOR
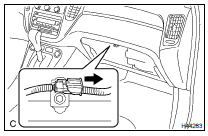
(a) Disconnect the connector from the front passenger airbag assy.
NOTICE: When handling the airbag connector, take care not to damage the airbag wire harness.
6. REMOVE FRONT PASSENGER AIRBAG ASSY
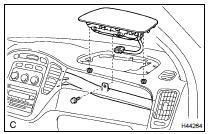
(a) Remove the bolt and the 2 nuts.
(b) Remove the front passenger airbag assy.
7. INSPECT FRONT PASSENGER AIRBAG ASSY (SEE PAGE 60-1 1)
8. INSTALL FRONT PASSENGER AIRBAG ASSY
(a) Install the front passenger airbag assy with the bolt and the 2 nuts.
Torque: Bolt: 20 NVm (204 kgfVcm, 15 ftVlbf) Nut: 5.6 NVm (57 kgfVcm, 49 in.Vlbf)
9. CONNECT FRONT PASSENGER AIRBAG ASSY CONNECTOR
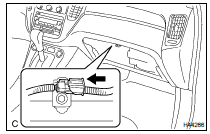
(a) Connect the connector to the front passenger airbag assy.
NOTICE: When handling the airbag connector, take care not to damage the airbag wire harness.
10. CONNECT BATTERY NEGATIVE TERMINAL
11. INSPECT SRS WARNING LIGHT (SEE PAGE 05-1207 )
 Front passenger airbag ASSY
COMPONENTS
...
 Disposal
HINT:
When scrapping a vehicle equipped with the SRS or disposing of the front
passenger airbag assy, be sure
to deploy the airbag first in accordance with the procedure described below. If
any ...
More about Toyota Highlander:
Outside temperature display
The temperature display shows temperatures within the range of -40°F
(-40°C) to 122°F (50°C).
Vehicles with monochrome display
Vehicles with color display
The outside temperature is displayed when
Vehicles without a smart key system
the engine switch is in the "o ...
