Toyota Highlander Service Manual: Replacement
HINT: Installation is in the reverse order of removal.
1. PRECAUTION (SEE PAGE 60-1 )
2. DISCONNECT BATTERY NEGATIVE TERMINAL (SEE PAGE 60-1 )
3. REMOVE STEERING WHEEL COVER LOWER NO.3
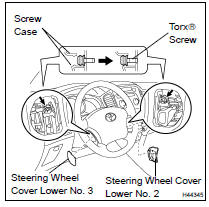
(a) Using a screwdriver, remove the steering wheel cover lower No.3.
HINT: Tape up the screwdriver tip before use.
4. REMOVE STEERING WHEEL COVER LOWER NO.2
(a) Using a screwdriver, remove the steering wheel cover lower No.2.
HINT: Tape up the screwdriver tip before use.
5. REMOVE HORN BUTTON ASSY
(a) Place the front wheels facing straight ahead.
(b) Using a torx) socket wrench (T30), loosen the 2 torx) screws until the groove along the screw circumference catches on the screw case.
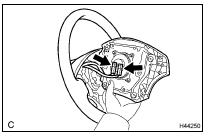
(c) Pull out the horn button assy from the steering wheel assy and support the horn button assy with one hand as shown in the illustration.
NOTICE: When removing the horn button assy, do not pull the airbag wire harness.
(d) Disconnect the horn connector.
(e) Disconnect the 2 connectors from the horn button assy.
NOTICE: When handling the airbag connector, take care not to damage the airbag wire harness.
(f) Remove the horn button assy.
6. INSTALL HORN BUTTON ASSY

(a) Support the horn button assy with one hand as shown in the illustration.
(b) Connect the 2 connectors to the horn button assy.
NOTICE: When handling the airbag connector, take care not to damage the airbag wire harness.
(c) Connect the horn connector.
(d) Confirm that the circumference groove of the torx) screw fits in the screw case, and place the horn button assy onto the steering wheel assy.
(e) Using a torx) socket wrench (T30), tighten the 2 torx) screws.
Torque: 8.8 NVm (90 kgfVcm, 78 in.Vlbf)
7. CONNECT BATTERY NEGATIVE TERMINAL
8. INSPECT HORN BUTTON ASSY
(a) With the horn button assy installed on the vehicle, perform a visual check including the following: Cuts, minute cracks or marked discoloration on the horn button assy top surface and in the grooved portion.
(b) Make sure that the horn sounds.
HINT: If the horn does not sound, inspect the horn system (see page 69-2 ).
9. INSPECT SRS WARNING LIGHT (SEE PAGE 05-1207 )
 Horn button ASSY
COMPONENTS
...
 Disposal
HINT:
When scrapping a vehicle equipped with the SRS or disposing of the horn button
assy, be sure to deploy
the airbag first in accordance with the procedure described below. If any
abnormality ...
More about Toyota Highlander:
Emission control
SERVICE DATA
2AZ-FE
3MZ-FE
INTAKE
SERVICE DATA
3MZ-FE
TORQUE SPECIFICATION
3MZ-FE
...
