Toyota Highlander Service Manual: Power point socket ASSY RR
REPLACEMENT
HINT:
- COMPONENTS: See page 67-2
- Installation is in the reverse order of removal.
1. REMOVE POWER POINT SOCKET ASSY RR

(a) Using a screwdriver, disengage the claw on the power point socket cover from the hole in the power point socket, then pull out the power point socket approx. 10 mm (0.39 in.).
HINT: Tape the screwdriver tip before use.
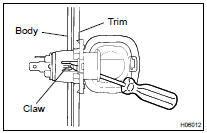
(b) Using a screwdriver, disengage the claw on the power point socket cover from the body and remove the power point socket and cover as a unit.
HINT: Tape the screwdriver tip before use.
(c) Disconnect the connector.
(d) Disassemble the power point socket from the socket cover.
2. INSTALL POWER POINT SOCKET ASSY RR
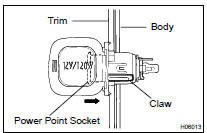
(a) Assemble the power point socket to the power point socket cover at the position 10 mm (0.39 in.) away from full lock position and ensure that they are temporarily locked.
(b) Align the cut-out on the body with the claw on the power point socket cover and install the power point socket and cover to the body.
(c) After installing them, push in the power point socket approx. 10 mm (0.39 in.) to lock it.
 Power outlet socket ASSY CTR
REPLACEMENT
HINT:
COMPONENTS: See page 67-2
Installation is in the reverse order of removal.
1. REMOVE POWER OUTLET SOCKET ASSY CTR
(a) Turn the socket in the circumference direction as ...
 Power outlet socket ASSY
REPLACEMENT
HINT:
COMPONENTS: See page 67-2
Installation is in the reverse order of removal.
1. REMOVE INSTRUMENT CLUSTER FINISH PANEL ASSY CENTER
2. REMOVE FRONT SEAT ARMREST ASSY CENTER
...
More about Toyota Highlander:
Audio settings
Settings are available for adjusting the radio operation, cover
art, etc.
Screen for audio settings
Press the “setup” button.
Select “audio” on the “setup” screen.
Number of radio presets
select the number of radio
preset stations.
Select input video sound.
Sele ...
