Toyota Highlander Service Manual: Fuel injector ASSY (2AZ-FE)
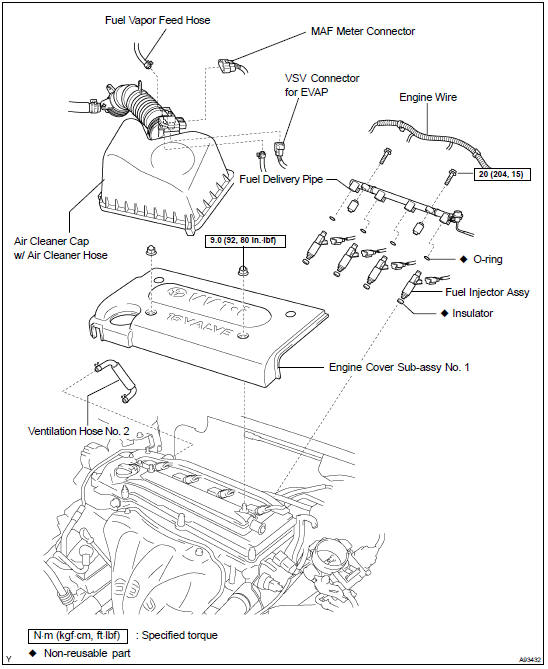
COMPONENTS
REPLACEMENT
1. WORK FOR PREVENTING GASOLINE FROM SPILLING OUT (See page 11-1 )
2. REMOVE AIR CLEANER CAP WITH AIR CLEANER HOSE
3. REMOVE ENGINE COVER SUB-ASSY NO.1
4. DISCONNECT FUEL TUBE SUB-ASSY (See page 16-6 )
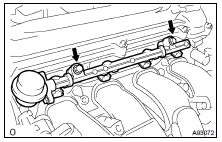
5. REMOVE FUEL DELIVERY PIPE W/INJECTOR
NOTICE: Be careful not to drop the injectors when removing the delivery pipe.
(a) Remove the ventilation hose No. 2.
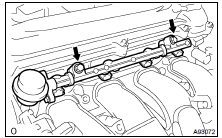
(b) Disconnect the 4 injector connecters from the injector.
(c) Remove the 2 clamps and wire harnesses from the delivery pipe.
(d) Remove the 2 bolts and the delivery pipe together with the 4 injectors.
(e) Remove the 2 spacers from the cylinder head.
6. REMOVE FUEL INJECTOR ASSY
(a) Pull out the 4 injectors from the delivery pipe.
7. INSTALL FUEL INJECTOR ASSY
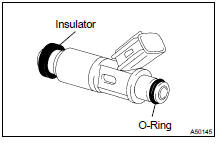
(a) Install a new insulator to each injector.
(b) Apply a light coat of grease or gasoline to a new O-ring and install to each injector.
(c) Apply a light coat of grease or gasoline on the place where a delivery pipe touches the O-ring.
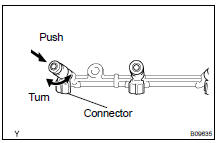
(d) To install the fuel injector into the fuel delivery pipe, push the fuel injector while twisting it back and forth.
(e) Install the 4 injectors.
NOTICE:
- Be careful not to twist the O-ring.
- After installing the fuel injector, check that it turns smoothly. If not, reinstall it with a new O-ring.
(f) Position the injector connector downward.
8. INSTALL FUEL DELIVERY PIPE W/INJECTOR
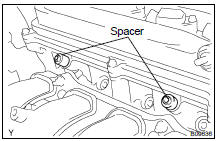
(a) Place the 2 spacers in position on the cylinder head.
(b) Place the delivery pipe together with the 4 injectors in position on the cylinder head.
(c) Temporarily install the 2 bolts holding the delivery pipe to the cylinder.
NOTICE: After installing the fuel injector, check that it turns smoothly.
If not, reinstall it with a new O-ring.
(d) Position the injector connector outward.
(e) Tighten the 2 bolts holding the delivery pipe to the cylinder head.
Torque: 20 NVm (204 kgfVcm, 15 ftVlbf)
9. CONNECT FUEL TUBE SUB-ASSY
10. INSPECT FOR FUEL LEAKS (See page 11-4 )
11. INSTALL ENGINE COVER SUB-ASSY NO.1 (See page 14-24 )
12. INSTALL AIR CLEANER CAP WITH AIR CLEANER HOSE (See page 14-24 )
 Inspection
1. INSPECT FUEL INJECTOR ASSY
(a) Check the injector resistance.
Measure the resistance between the terminals.
Standard: 11.6 to 12.4 W at 20 C (68 F)
If the result is not as specified ...

More about Toyota Highlander:
Inspection
1. COOLER THERMISTOR NO.1(MANUAL AIR CONDITIONER)
(a) Remove cooler thermistor No. 1.
(b) Check resistance between terminals 1 and 2 of cooler
thermistor No. 1 at each temperature, as shown in the
chart.
Standard:
NOTICE:
Even slightly touching the sensor may change the resistance
...
