Toyota Highlander Service Manual: Fan and generator v belt (2AZ-FE)
REPLACEMENT
1. REMOVE FRONT WHEEL RH
2. REMOVE FRONT FENDER SPLASH SHIELD FRONT RH
3. REMOVE FRONT FENDER APRON SEAL RH
4. REMOVE ENGINE MOUNTING STAY NO.2 RH
5. REMOVE ENGINE COVER SUB-ASSY NO.1
6. REMOVE ENGINE MOVING CONTROL ROD W/BRACKET (See page 14-24 )
7. REMOVE ENGINE MOUNTING BRACKET NO.2 RH
8. REMOVE FAN AND GENERATOR V BELT
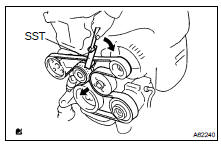
(a) Slowly turn the belt tensioner clockwise for more than 3 seconds, and remove the drive belt by using SST.
SST 09843-18030
9. INSTALL FAN AND GENERATOR V BELT
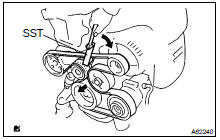
(a) Slowly turn the belt tensioner clockwise for more than 3 seconds, and install the drive belt by using SST.
SST 09249-63010
10. INSTALL ENGINE MOUNTING BRACKET NO.2 RH Torque: 52 NVm (531 kgfVcm, 38 ftVlbf)
11. INSTALL ENGINE MOVING CONTROL ROD W/BRACKET (See page 14-24 )
12. INSTALL ENGINE MOUNTING STAY NO.2 RH Torque: 64 NVm (653 kgfVcm, 47 ftVlbf)
13. INSTALL FRONT WHEEL RH
 Engine (2AZ-FE)
INSPECTION
1. INSPECT ENGINE COOLANT (See page 16-6 )
2. INSPECT ENGINE OIL
3. INSPECT BATTERY
4. INSPECT AIR CLEANER FILTER ELEMENT SUB-ASSY
5. INSPECT SPARK PLUG (See page 18-3 )
6. INSPECT V- ...
 Valve clearance (2AZ-FE)
ADJUSTMENT
1. REMOVE FRONT WHEEL RH
2. REMOVE FRONT FENDER SPLASH SHIELD FRONT RH
3. REMOVE FRONT FENDER APRON SEAL RH
4. REMOVE ENGINE COVER SUB-ASSY NO.1
5. REMOVE IGNITION COIL ASSY
6. REMOVE ...
More about Toyota Highlander:
Yawrate sensor
REPLACEMENT
NOTICE:
Do not use the yawrate sensor if it is dropped or damaged.
Prevent foreign matter from attaching between the yawrate sensor
bracket and body.
Confirm the sensor direction is correct.
1. REMOVE FRONT SEAT ASSEMBLY RH (SEE PAGE 72-1 1 or 72-19 )
2. REMOVE FRONT DOOR ...
