Toyota Highlander Service Manual: Air bag sensor ASSY center
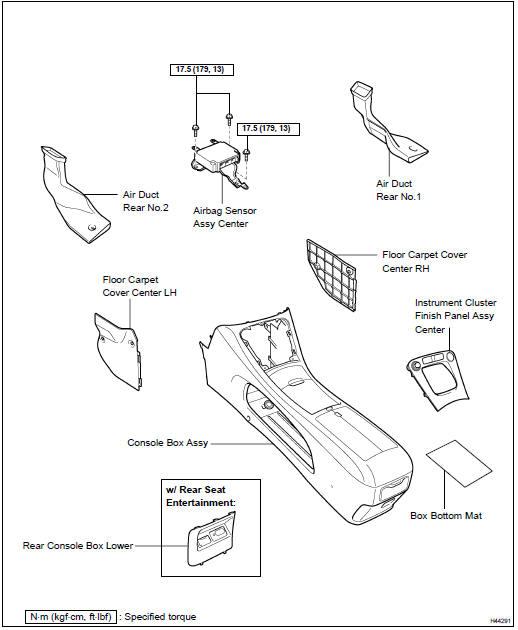
COMPONENTS
REPLACEMENT
HINT: Installation is in the reverse order of removal.
1. PRECAUTION (SEE PAGE 60-1 )
2. DISCONNECT BATTERY NEGATIVE TERMINAL (SEE PAGE 60-1 )
3. REMOVE FLOOR CARPET COVER CENTER LH (SEE PAGE 71-10 )
4. REMOVE FLOOR CARPET COVER CENTER RH (SEE PAGE 71-10 )
5. REMOVE INSTRUMENT CLUSTER FINISH PANEL ASSY CENTER (SEE PAGE 71-10 )
6. REMOVE REAR CONSOLE BOX LOWER (W/ REAR SEAT ENTERTAINMENT) (SEE PAGE 71-10 )
7. REMOVE BOX BOTTOM MAT (SEE PAGE 71-10 )
8. REMOVE CONSOLE BOX ASSY (SEE PAGE 71-10 )
9. REMOVE AIR DUCT REAR NO.2 (SEE PAGE 55-29 )
10. REMOVE AIR DUCT REAR NO.1 (SEE PAGE 55-29 )
11. REMOVE AIR BAG SENSOR ASSY CENTER
(a) Disconnect the 3 connectors from the airbag sensor assy center.
(b) Remove the 3 bolts and the airbag sensor assy center.
12. INSTALL AIR BAG SENSOR ASSY CENTER
(a) Check that the ignition switch is off.
(b) Check that the battery negative (-) terminal is disconnected.
CAUTION: After removing the terminal, wait for at least 90 seconds before starting the operation.
(c) Temporarily install the airbag sensor assy center with the 3 bolts.
NOTICE:
- If the airbag sensor assy center has been dropped, or there are any cracks, dents or other defects in the case, bracket or connector, replace it with a new one.
- When installing the airbag sensor assy center, be careful that the SRS wiring does not interfere with other parts and that it is not pinched between other parts.
(d) Tighten the 3 bolts to the specified torque.
Torque: 17.5 NVm (179 kgfVcm, 13 ftVlbf)
(e) Connect the 3 connectors to the airbag sensor assy center.
(f) Check that there is no looseness in the installation parts of the airbag sensor assy center.
(g) Check that the water-proof sheet is properly set.
13. CONNECT BATTERY NEGATIVE TERMINAL
14. INSPECT SRS WARNING LIGHT (SEE PAGE 05-1207 )
 Front seat airbag ASSY LH
DISPOSAL
HINT:
Disposal procedure of the RH side is the same as that for the LH
side.
The procedures listed below are for the LH side.
When scrapping a vehicle equipped with the SRS or dis ...
 Airbag sensor front LH
COMPONENTS
REPLACEMENT
HINT:
Use the same procedures for the RH side and LH side.
The procedures listed below are for the LH side.
Installation is in the reverse order of removal.
1. PR ...
More about Toyota Highlander:
Windshield wipers and
washer
Operating the wiper lever
The wiper operation is selected by moving the lever as follows.
*1 Or
*2 Intermittent windshield
wiper operation
*1 Or
*2 Low speed windshield
wiper operation
*1 Or
*2 High speed windshield
wiper operation
*1 Or
*2 V
*1: For u.S.A.
*2: For ...
