Toyota Highlander Service Manual: Rear axle carrier sub-ASSY LH (FF)
REPLACEMENT
HINT: COMPONENTS: SEE PAGE 30-4 Replace the RH side by the same procedures with the LH side.
1. REMOVE REAR WHEEL
2. SEPARATE REAR DISC BRAKE CALIPER ASSY LH
3. REMOVE REAR DISC (SEE PAGE 32-29 )
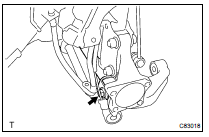
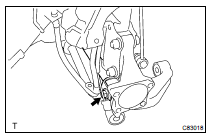
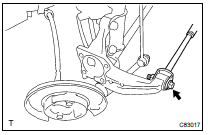
4. DISCONNECT SKID CONTROL SENSOR
(a) Disconnect the connector.
5. REMOVE REAR AXLE HUB & BEARING ASSY LH
6. SEPARATE STRUT ROD ASSY REAR
7. SEPARATE REAR SUSPENSION ARM ASSY NO.2 LH

(a) Remove the bolt, nut and rear suspension arm No. 2 from the rear axle carrier.
HINT: While fixing the nut, turn and remove the bolt.
8. SEPARATE REAR SUSPENSION ARM ASSY NO.1 LH
(a) Remove the bolt, nut and rear suspension arm No. 1 from the rear axle carrier.
HINT: While fixing the nut, turn and remove the bolt.
9. REMOVE REAR AXLE CARRIER SUB-ASSY LH
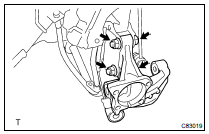
(a) Remove the 2 bolts, nuts and rear axle carrier from the shock absorber
10. INSTALL REAR AXLE CARRIER SUB-ASSY LH
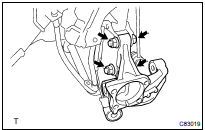
(a) Install the rear axle carrier with the 2 bolts and nuts.
Torque: 180 NVm (1,840 kgfVcm, 133 ftVlbf)
HINT: Insert the bolt from the rear side of the vehicle and install the nut.
11. TEMPORARILY TIGHTEN REAR SUSPENSION ARM ASSY NO.1 LH
(a) Install the rear suspension arm No. 1 to the rear axle carrier with the bolt and nut, temporarily tighten the bolt.
HINT: Insert the bolt from the front side of the vehicle and while fixing the nut, turn and install the bolt.
12. TEMPORARILY TIGHTEN REAR SUSPENSION ARM ASSY NO.2 LH
(a) Install the rear suspension arm No. 2 to the rear axle carrier with the bolt and nut, temporarily tighten the bolt.
HINT: Insert the bolt from the rear side of the vehicle and while fixing the nut, turn and install the bolt.
13. TEMPORARILY TIGHTEN STRUT ROD ASSY REAR (SEE PAGE 27-13 )
14. INSTALL REAR AXLE HUB & BEARING ASSY LH (SEE PAGE 30-53 )
15. INSPECT BEARING BACKLASH (SEE PAGE 30-3 )
16. INSPECT AXLE HUB DEVIATION (SEE PAGE 30-3 )
17. CONNECT SKID CONTROL SENSOR
(a) Connect the connector.
NOTICE: Do not twist the sensor wire when connecting it.
18. INSTALL REAR DISC (SEE PAGE 32-29 )
19. INSTALL REAR DISC BRAKE CALIPER ASSY LH (SEE PAGE 30-53 )
20. INSTALL REAR WHEEL
Torque: 103 NVm (1,050 kgfVcm, 76 ftVlbf)
21. STABILIZE SUSPENSION (SEE PAGE 27-27 )
22. FULLY TIGHTEN REAR SUSPENSION ARM ASSY NO.1 LH (SEE PAGE 27-16 )
23. FULLY TIGHTEN REAR SUSPENSION ARM ASSY NO.2 LH (SEE PAGE 27-23 )
24. FULLY TIGHTEN STRUT ROD ASSY REAR (SEE PAGE 27-13 )
25. INSPECT AND ADJUST REAR WHEEL ALIGNMENT (SEE PAGE 27-5 )
26. CHECK ABS SPEED SENSOR SIGNAL (SEE PAGE 05-765 )
 Rear axle hub & bearing ASSY LH (4WD)
REPLACEMENT
HINT:
COMPONENTS: SEE PAGE 30-4
1. REMOVE REAR WHEEL
2. SEPARATE SPEED SENSOR REAR LH
3. REMOVE REAR AXLE SHAFT LH NUT
(a) Using SST and a hammer, unstake the staked part of the
...
 Rear axle carrier sub-ASSY LH (4WD)
REPLACEMENT
HINT:
COMPONENTS: SEE PAGE 30-4
Replace the RH side using the same procedures as for the LH side.
1. REMOVE REAR WHEEL
2. SEPARATE SPEED SENSOR REAR LH
(a) Remove the bolt and separa ...
More about Toyota Highlander:
Steering column ASSY
COMPONENTS
OVERHAUL
1. PRECAUTION (SEE PAGE 60-1 )
2. DISCONNECT BATTERY NEGATIVE TERMINAL (SEE PAGE 60-1 )
3. PLACE FRONT WHEELS FACING STRAIGHT AHEAD
4. REMOVE STEERING WHEEL COVER LOWER NO.2 (SEE PAGE 60-17 )
5. REMOVE HORN BUTTON ASSY (SEE PAGE 60-17 )
6. REMOVE STEERING WHEEL ASSY
...
