
Toyota Highlander Service Manual: Front suspension ARM sub-ASSY lower NO.1 LH
REPLACEMENT
HINT:
COMPONENTS: See page 26-3 .
Use the same procedures for the RH side and LH side.
The procedures listed below are for the LH side.
1. REMOVE ENGINE ASSEMBLY WITH TRANSAXLE (3MZ-FE ENGINE TYPE) (SEE PAGE 14-149 )
2. REMOVE ENGINE ASSEMBLY WITH TRANSAXLE (2AZ-FE ENGINE TYPE) (SEE PAGE 14-24 )
3. REMOVE TRANSVERSE ENGINE MOUNTING INSULATOR
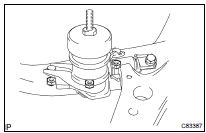
(a) Remove the 3 nuts and the transverse engine mounting insulator.
4. REMOVE FRONT SUSPENSION ARM SUB- ASSY LOWER NO.1 LH
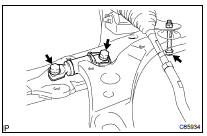
(a) Remove the 3 bolts and the nut on the suspension arm lower No.1 LH and remove it from the front frame assy.
(b) Remove the front lower arm bush stopper.
5. INSTALL FRONT SUSPENSION ARM SUB- ASSY LOWER NO.1 LH
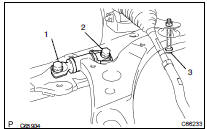
(a) Install the front lower arm bush stopper.
(b) Install the suspension arm lower No.1 LH to the front frame assy with the 3 bolts and the nut.
(c) Tighten the 3 bolts in numerical order as shown in the illustration.
Torque: (bolt 1, 2) 200 NVm (2,040 kgfVcm, 148 ftVlbf) (bolt 3) 206 NVm (2,100 kgfVcm, 152 ftVlbf)
HINT: Start tightening the bolts from the front side of the vehicle.
6. INSTALL TRANSVERSE ENGINE MOUNTING INSULATOR
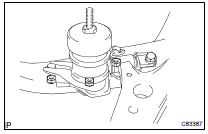
(a) Install the transverse engine mounting insulator with the 3 nuts.
Torque: 87 NVm (887 kgfVcm, 64 ftVlbf)
7. INSTALL ENGINE ASSEMBLY WITH TRANSAXLE (3MZ-FE ENGINE TYPE) (SEE PAGE
14-149 )
8. INSTALL ENGINE ASSEMBLY WITH TRANSAXLE (2AZ-FE ENGINE TYPE) (SEE PAGE 14-24 )
 Disposal
HINT:
Dispose of the RH side by following the same procedures as with the LH side.
1. DISPOSE OF SHOCK ABSORBER ASSY FRONT LH
(a) Fully extend the shock absorber rod.
(b) Using a drill, make a ...
 Lower ball joint ASSY front LH
REPLACEMENT
HINT:
COMPONENTS: See page 26-3 .
Use the same procedures for the RH side and LH side.
The procedures listed below are for the LH side.
1. REMOVE FRONT WHEEL
2. REMOVE FRONT A ...
More about Toyota Highlander:
Engine oil consumption
A certain amount of engine oil will be consumed while driving. In the
following
situations, oil consumption may increase, and engine oil may need to be
refilled in between oil maintenance intervals.
When the engine is new, for example directly after purchasing the
vehicle or
after repla ...
