Toyota Highlander Service Manual: Engine rear oil seal (2AZ-FE)
REPLACEMENT
1. REMOVE AUTOMATIC TRANSAXLE ASSY (See page 40-12 )
HINT: Remove and install the transaxle after removing the engine assy w/ transaxle.
2. REMOVE DRIVE PLATE & RING GEAR SUB-ASSY
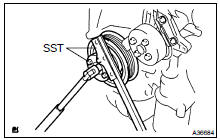
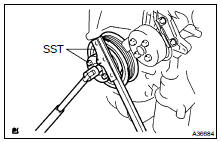
(a) Using SST, fix the crankshaft.
SST 09213-54015 (91651-60855), 09330-00021
(b) Remove the 8 bolts, rear spacer, drive plate and front spacer.
3. REMOVE ENGINE REAR OIL SEAL
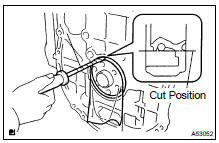
(a) Using a knife, cut through the oil seal lip.
(b) Using a screwdriver with its tip taped, pry out the oil seal.
NOTICE: After the removal, check the crankshaft for damage. If it is damaged, smooth the surface with 400-grit sandpaper.
4. INSTALL ENGINE REAR OIL SEAL
(a) Apply MP grease to a new oil seal lip.
NOTICE: Keep the lip free from foreign matter.
(b) Using SST and a hammer, tap in the oil seal until its surface is flush with the rear oil seal retainer edge.
SST 09223-15030, 09950-70010 (09951-07100)
NOTICE: Wipe off extra grease from the crankshaft.
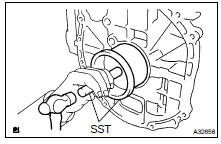
5. INSTALL DRIVE PLATE & RING GEAR SUB-ASSY
(a) Using SST, fix the crankshaft.
SST 09213-54015 (91651-60855), 09330-00021
(b) Clean the bolt and the bolt hole.
(c) Apply adhesive to 2 or 3 threads of the bolt end.
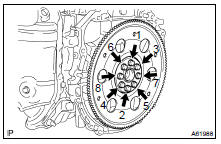
Adhesive: Part No. 08833-00070, THREE BOND or equivalent (d) Install the front spacer, drive plate and rear spacer with the 8 bolts. Uniformly tighten the bolts in the sequence shown in the illustration.
Torque: 98 NVm (1,000 kgfVcm, 72 ftVlbf)
6. INSTALL AUTOMATIC TRANSAXLE ASSY (See page 40-12 )
 Timing gear case or timing chain case oil
seal (2AZ-FE)
Timing gear case or timing chain case oil
seal (2AZ-FE)
REPLACEMENT
1. REMOVE FRONT WHEEL RH
2. REMOVE FRONT FENDER SPLASH SHIELD FRONT RH
3. REMOVE FRONT FENDER APRON SEAL RH
4. REMOVE ENGINE COVER SUB-ASSY NO.1
5. REMOVE ENGINE MOUNTING STAY NO.2 RH ...
 Cylinder head ASSY (2AZ-FE)
COMPONENTS
OVERHAUL
1. REMOVE VALVE LIFTER
HINT:
Arrange the valve lifters in the correct order.
2. REMOVE INTAKE VALVE
(a) Using SST and wooden blocks, compress and remove
the 8 valve ...
More about Toyota Highlander:
Throttle body ASSY (2AZ-FE)
COMPONENTS
REPLACEMENT
1. DRAIN ENGINE COOLANT (See page 16-6 )
2. REMOVE AIR CLEANER CAP WITH AIR CLEANER HOSE (See page 14-24 )
3. REMOVE THROTTLE BODY ASSY
(a) Disconnect the throttle control motor & throttle position
sensor connector.
(b) Disconnect the vacuum hose from the throttle ...
