Toyota Highlander Service Manual: Transmission wire (U151E/U151F)
REPLACEMENT
1. REMOVE ENGINE UNDER COVER NO.1
2. DRAIN AUTOMATIC TRANSAXLE FLUID
(a) Remove the drain plug and gasket, and drain ATF.
(b) Install a new gasket and the drain plug.
Torque: 49 NVm (500 kgfVcm, 36 ftVlbf)
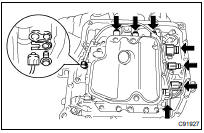
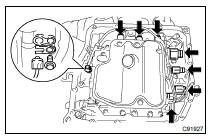
3. REMOVE AUTOMATIC TRANSAXLE OIL PAN SUB-ASSY
(a) Remove the 18 bolts, oil pan and gasket.
NOTICE: Some fluid will remain in the oil pan. Remove all of the oil pan bolts, and carefully remove the oil pan assembly.
(b) Remove the 2 magnets from the oil pan.
(c) Examine the particles in the oil pan.
- Remove the magnets and use them to collect any
steel chips. Look at the chips and particles in the
pan and on the magnet carefully to see the type of
wear which might be found in the transaxle.
Steel (magnetic): bearing, gear and plate wear Brass (non-magnetic): bearing wear
4. DISCONNECT TRANSMISSION WIRE
(a) Disconnect the 7 shift solenoid valve connectors.
(b) Remove the bolt and lock plate, and disconnect the ATF temperature sensor.
5. REMOVE TRANSMISSION WIRE
(a) Disconnect the transmission wire connectors.
(b) Remove the bolt and transmission wire
6. INSTALL TRANSMISSION WIRE
(a) Coat an O-ring of the transmission wire connector with ATF.
(b) Install the transmission wire and bolt.
Torque: 5.4 NVm (55 kgfVcm, 48 in.Vlbf)
7. CONNECT TRANSMISSION WIRE
(a) Coat an O-ring of the ATF temperature sensor with ATF.
(b) Install the ATF temperature sensor with the lock plate and bolt.
Torque: 6.6 NVm (67 kgfVcm, 58 in.Vlbf)
(c) Connect the 7 shift solenoid valve connectors.
8. INSTALL AUTOMATIC TRANSAXLE OIL PAN SUB-ASSY
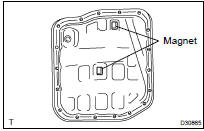
(a) Install the 2 magnets in the oil pan.
(b) Apply the seal packing or equivalent to the 18 bolts.
Seal packing: THREE BOND 1344 or equivalent
(c) Install a new gasket, oil pan and 18 bolts to the transaxle case.
Torque: 7.8 NVm (80 kgfVcm, 69 in.Vlbf)
NOTICE: Apply the seal packing or equivalent to the bolts and tighten them within 10 minutes of application.
9. ADD AUTOMATIC TRANSAXLE FLUID
10. INSPECT AUTOMATIC TRANSAXLE FLUID (SEE PAGE 40-2 )
11. INSTALL ENGINE UNDER COVER NO.1
12. RESET MEMORY (SEE PAGE 05-1005 )
 Transmission wire (U241E/U140F)
REPLACEMENT
1. REMOVE ENGINE UNDER COVER NO.1
2. DRAIN AUTOMATIC TRANSAXLE FLUID
(a) Remove the drain plug, gasket and drain ATF.
(b) Install a new gasket and drain plug.
Torque: 49 NVm (500 kg ...
 Transmission valve body ASSY (U241E/U140F)
REPLACEMENT
1. REMOVE ENGINE UNDER COVER NO.1
2. DRAIN AUTOMATIC TRANSAXLE FLUID
(a) Remove the drain plug, gasket and drain ATF.
(b) Install a new gasket and drain plug.
Torque: 49 NVm (500 kg ...
More about Toyota Highlander:
Air outlets
Location of air outlets
The air outlets and air volume
change according to the
selected airflow mode.
Adjusting the position of and opening and closing the air outlets
Front center outlets
Direct air flow to the left or right,
up or down.
Front side outlets
Direct air flow ...
