Toyota Highlander Service Manual: Roof drip side finish moulding center LH
REPLACEMENT
HINT:
- The installation is in the reverse order of the removal. However, when there is a special point concerning the installation, it is indicated.
- On the RH side, use the same procedures as on the LH side.
1. REMOVE ROOF DRIP SIDE FINISH MOULDING CENTER LH
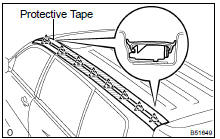
(a) Cover the circumference of the moulding with protective tape for protection.
(b) Using a remover for the roof moulding, release the engagements of the clips in both front and rear ends of the moulding, and then remove the moulding.
NOTICE:
- Do not remove the clips.
- In case that the clips are damaged or removed accidentally, exchange them for supplied ones.
2. INSTALL ROOF DRIP SIDE FINISH MOULDING CLIP NO.2
NOTICE: Only when exchanging the clips.
(a) Remove the adhesive tape that remains on the mounting surface of the body, and then clean the surface with white gasoline.
(b) Using a heat light, heat up the clip installation surfaces of the body and moulding.
Heating temperature:

NOTICE: Do not heat the body and moulding excessively.
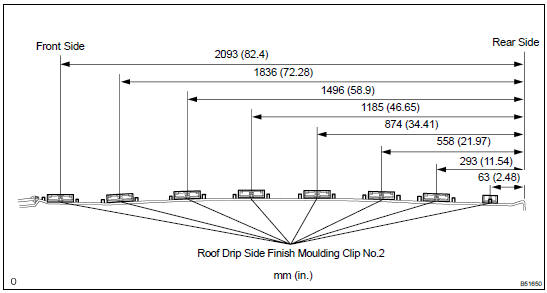
(c) Set the supplied clips into the positions as shown in the illustration, and press-fit those clips by hand to install them.
(d) Install the moulding when 30 minutes or more have passed after press-fitting the clips.
HINT:
- Initial hardening time: 30 minutes
- Prefect hardening time: 24 hours
 Outside moulding
REPLACEMENT
HINT:
The installation procedures are the removal procedures in reverse
order. However, only installation
procedures requiring additional information are included.
Use the same ...
 Roof headlining ASSY
COMPONENTS
REPLACEMENT
HINT:
The installation procedures are the removal procedures in reverse
order. However, only installation
procedures requiring additional information are includ ...
More about Toyota Highlander:
Fuel injector ASSY (2AZ-FE)
COMPONENTS
REPLACEMENT
1. WORK FOR PREVENTING GASOLINE FROM SPILLING OUT (See page 11-1 )
2. REMOVE AIR CLEANER CAP WITH AIR CLEANER HOSE
3. REMOVE ENGINE COVER SUB-ASSY NO.1
4. DISCONNECT FUEL TUBE SUB-ASSY (See page 16-6 )
5. REMOVE FUEL DELIVERY PIPE W/INJECTOR
NOTICE:
Be careful no ...
