Toyota Highlander Service Manual: Replacement
HINT:
- Use the same procedures for the RH side and LH side.
- The procedures listed below are for the LH side.
- Installation is in the reverse order of removal.
1. PRECAUTION (SEE PAGE 60-1 )
2. DISCONNECT BATTERY NEGATIVE TERMINAL (SEE PAGE 60-1 )
3. REMOVE ROOF HEADLINING ASSY (SEE PAGE 76-21 )
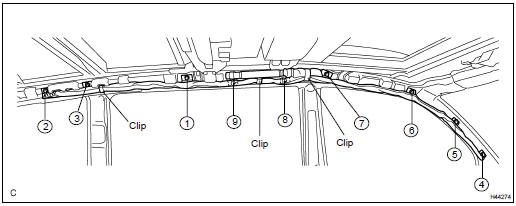
4. REMOVE CURTAIN SHIELD AIR BAG ASSY LH
(a) Disconnect the connector from the curtain shield airbag assy LH.
NOTICE: When handling the airbag connector, take care not to damage the airbag wire harness.
(b) Remove the 3 clips.
(c) Remove the 9 bolts and the curtain shield airbag assy LH in the order shown in the illustration.
5. INSPECT CURTAIN SHIELD AIR BAG ASSY LH (SEE PAGE 60-1 1)
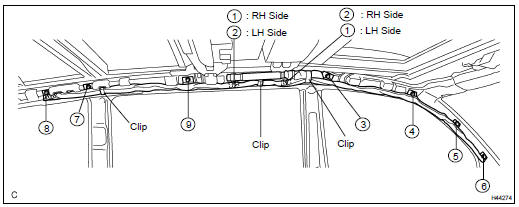
6. INSTALL CURTAIN SHIELD AIR BAG ASSY LH
(a) Install the curtain shield airbag assy LH with the 9 bolts in the order shown in the illustration.
(b) Install the 3 clips.
Torque: 14 NVm (143 kgfVcm, 10 ftVlbf)
(c) Connect the connector to the curtain shield airbag assy LH.
NOTICE: When handling the airbag connector, take care not to damage the airbag wire harness.
7. INSTALL ROOF HEADLINING ASSY (SEE PAGE 76-21 )
8. CONNECT BATTERY NEGATIVE TERMINAL
9. INSPECT SRS WARNING LIGHT (SEE PAGE 05-1207 )
 Curtain shield air bag ASSY LH
COMPONENTS
...
 Disposal
HINT:
Disposal procedure of the RH side is the same as that for the LH
side.
The procedures listed below are for the LH side.
When scrapping a vehicle equipped with the SRS or disposing of ...
More about Toyota Highlander:
Crankshaft position sensor (3MZ-FE)
REPLACEMENT
HINT:
A bolt without a torque specification is shown in the standard bolt chart (see
page 03-2 ).
1. REMOVE ENGINE UNDER COVER NO.1
(a) Remove the 6 screws, 2 clips and under cover.
2. REMOVE FRONT FENDER APRON SEAL RH
(a) Remove the clip, 2 bolts and apron seal.
3. REMO ...
