Toyota Highlander Service Manual: Park/neutral position switch ASSY (U241E/U140F)
REPLACEMENT
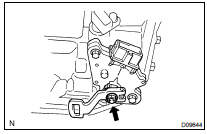
1. REMOVE ENGINE UNDER COVER NO.1
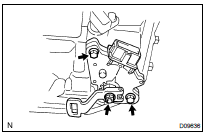
2. SEPARATE TRANSMISSION CONTROL CABLE ASSY

(a) Remove the nut from the control shaft lever.
(b) Disconnect the control cable from the control shaft lever.

(c) Remove the clip and disconnect the control cable from the control cable bracket.
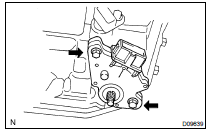
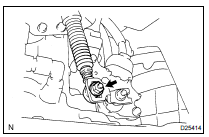
3. REMOVE PARK/NEUTRAL POSITION SWITCH ASSY
(a) Remove the nut, washer and control shaft lever.
(b) Pry out the lock plate and remove the manual valve shaft nut.
(c) Remove the 2 bolts and pull out the park/neutral position switch.
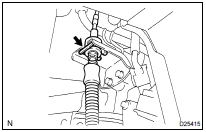
4. INSTALL PARK/NEUTRAL POSITION SWITCH ASSY
(a) Install the park/neutral position switch to the manual valve shaft.
(b) Place a new lock plate and tighten the nut.
Torque: 6.9 NVm (70 kgfVcm, 61 in.Vlbf)
(c) Temporarily install the 2 bolts.
(d) Temporarily install the control shaft lever.

(e) Turn the lever counterclockwise until it stops, then turn it clockwise 2 notches.
(f) Remove the control shaft lever.
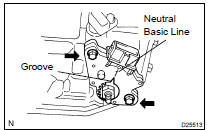
(g) Align the groove with neutral basic line.
(h) Hold the switch in position and tighten the 2 bolts.
Torque: 5.4 NVm (55 kgfVcm, 48 in.Vlbf)
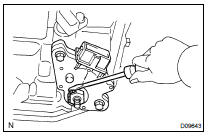
(i) Using a screwdriver, stake the nut with the lock plate.
(j) Install the control shaft lever, washer and nut.
Torque: 12.7 NVm (130 kgfVcm, 9 ftVlbf)
5. INSTALL TRANSMISSION CONTROL CABLE ASSY
(a) Temporarily install the control cable to the control shaft lever with nuts.
(b) Install the control cable and clip to the bracket.
6. ADJUST SHIFT LEVER POSITION (See page 40-71 )
7. INSPECT SHIFT LEVER POSITION
8. INSPECT PARK/NEUTRAL POSITION SWITCH ASSY (See page 40-6 )
 Automatic transaxle fluid (ATM)
ON-VEHICLE INSPECTION
1. CHECK FLUID LEVEL
HINT:
Drive the vehicle so that the engine and transaxle are at normal
operating temperature.
Fluid temperature: 70 - 80C (158 - 176F)
Par ...
 Adjustment
1. INSPECT PARK/NEUTRAL POSITION SWITCH ASSY
(a) Apply the parking brake and turn the ignition switch ON.
(b) Depress the brake pedal and check that the engine starts only when the shift
lever is ...
More about Toyota Highlander:
Automatic door locking and unlocking systems
The following functions can be set or canceled:
for instructions on customizing, refer to p. 662.
Function
Operation
Speed linked door locking function
All doors are automatically locked
when vehicle speed is approximately
12 mph (20 km/h) or higher.
Sh ...
