Toyota Highlander Service Manual: Overhaul
HINT:
- The installation procedures are the removal procedures in reverse order. However, only installation procedures requiring additional information are included.
- Use the same procedures for the RH side and LH side.
- The procedures listed below are for the LH side.
- A bolt without a torque specification is shown in the standard bolt chart (see page 03-2 ).
1. REMOVE MULTIPLEX NETWORK MASTER SWITCH ASSY
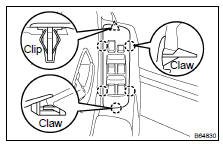
(a) Using a screwdriver, disengage the 5 claws and clip, remove the power window regulator master switch.
HINT: Tape the screwdriver tip before use.
(b) Disconnect the connector.
2. REMOVE FRONT DOOR LOWER FRAME BRACKET GARNISH LH
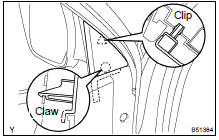
(a) Using a screwdriver, disengage the claw and clip, remove the front door lower frame bracket garnish.
HINT: Tape the screwdriver tip before use.
3. REMOVE DOOR PULL HANDLE
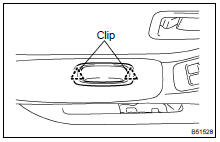
(a) Using a screwdriver, disengage the 2 clips and remove the door pull handle.
HINT: Tape the screwdriver tip before use.
4. REMOVE FRONT DOOR INSIDE HANDLE BEZEL LH
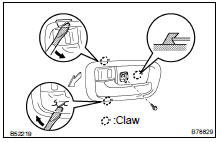
(a) Remove the screw.
(b) Using a screwdriver, disengage the 3 claws and remove the door inside handle bezel.
HINT: Tape the screwdriver tip before use.
5. REMOVE FRONT DOOR TRIM BOARD SUB-ASSY LH
(a) Remove the clip and screw.
(b) Using a screwdriver, disengage the 7 clips and remove the trim board.
HINT: Tape the screwdriver tip before use.
6. REMOVE FRONT DOOR INSIDE HANDLE SUB-ASSY LH
(a) Remove the bolt and inside handle.
(b) Disconnect the 2 cables from the door lock.
7. REMOVE FRONT DOOR SERVICE HOLE COVER LH
8. REMOVE FRONT NO. 2 SPEAKER ASSY
(a) Disconnect the connector.
(b) Remove the bolt and speaker.
9. REMOVE OUTER REAR VIEW MIRROR ASSY LH
(a) Remove the 3 bolts.
(b) Disconnect the connector and remove the mirror.
10. REMOVE FRONT NO. 1 SPEAKER ASSY
11. REMOVE FRONT DOOR BELT MOULDING ASSY LH (See page 76-1 1)
12. REMOVE FRONT DOOR GLASS RUN LH
13. REMOVE FRONT DOOR FRAME SUB-ASSY REAR LOWER LH
(a) Remove the bolt and door frame rear lower.
Torque: 8.0 NVm (82 kgfVcm, 71 in.Vlbf)
14. REMOVE FRONT DOOR GLASS SUB-ASSY LH
HINT: Insert a shop rag inside the door panel to prevent scratching the glass.
(a) Open the door glass until the bolts appear in the service hole.
(b) Remove the 2 bolts and door glass.
NOTICE: Do not damage the door glass.
HINT: Pull the glass upward to remove it.
Torque: 5.5 NVm (56 kgfVcm, 49 in.Vlbf)
15. REMOVE FRONT DOOR WINDOW REGULATOR SUB-ASSY LH
(a) Remove the 6 bolts.
(b) Disconnect the connector, and then remove the front door window regulator.
16. REMOVE POWER WINDOW REGULATOR MOTOR ASSY LH FRONT
(a) Using a torx) wrench (T25), remove the 3 screws and motor.
17. APPLY BODY GREASE
(a) Apply MP grease to the sliding and rotating parts of the regulator.
18. REMOVE FRONT DOOR LOCK ASSY LH
19. APPLY BODY GREASE
20. REMOVE FRONT DOOR OUTSIDE HANDLE FRAME SUB-ASSY LH
(a) Using a torx) wrench (T30), remove the 2 screws and door lock cylinder.
(b) Pushing the outside handle in the arrow mark direction as shown in the illustration, remove the outside handle and outside handle frame.
(c) Using a torx) wrench (T30), remove the screw and frame.
Torque: 4.0 NVm (41 kgfVcm, 36 in.Vlbf)
21. INSTALL FRONT DOOR LOCK ASSY LH
(a) Using a torx) wrench (T30), install the door lock with the 4 screws.
Torque: 5.0 NVm (50 kgfVcm, 45 in.Vlbf) for A 5.5 NVm (56 kgfVcm, 49 in.Vlbf) for B
(b) Install the 2 bolts.
(c) Connect the links to the outside handle.
(d) Connect the connector.
22. INSTALL POWER WINDOW REGULATOR MOTOR ASSY LH FRONT
(a) If the jam protection function does not operate properly, perform the following procedure.
HINT: It is necessary to reset the power window motor (in the initial position for the limit switch) when separating the window regulator from the power window motor or operating the window regulator with the door glass not installed.
- Remove the power window motor.
HINT: Place the mactchmarks on the power window motor and window regulator gear.
- Connect the power window motor and power window switch to the wire harness of the vehicle.
- Turn the ignition switch ON and operate the power window motor in the power window up direction for more than 6 rotations or less than 10 rotations (4 seconds or more) using the power window switch.
- Assemble the power window motor and regulator.
HINT:
- Install the motor when the regulator arm is below the middle point.
- Align the matchmarks on the power window motor and window regulator gear when installing the power window motor.
- Assemble the power window regulator and door glass.
Torque: 5.4 NVm (55 kgfVcm, 48 in.Vlbf)
HINT: Never rotate the motor in the power window's down direction until the window glass is completely installed.
23. INSTALL FRONT DOOR WINDOW REGULATOR SUB-ASSY LH
(a) Install the window regulator with the 4 bolts.
Torque: 11.0 NVm (112 kgfVcm, 8 ftVlbf)
24. INSTALL FRONT DOOR SERVICE HOLE COVER LH
(a) Install a new service hole cover to the door panel.
HINT:
- When installing the service hole cover, pull out the links and connectors through the service hole cover.
- There should be no wrinkles or folds after installing the service hole cover.
- After installing the service hole cover, check the sealing condition.
25. INSTALL OUTER REAR VIEW MIRROR ASSY LH
(a) Install the mirror with the 3 bolts.
Torque: 8.0 NVm (82 kgfVcm, 71 in.Vlbf)
 Adjustment
HINT:
Before adjusting the door position for vehicles equipped with side
airbags and curtain shield airbags,
be sure to disconnect the battery. After adjustment, inspect the SRS warning
la ...
 Rear door
COMPONENTS
...
More about Toyota Highlander:
Throttle body ASSY (2AZ-FE)
COMPONENTS
REPLACEMENT
1. DRAIN ENGINE COOLANT (See page 16-6 )
2. REMOVE AIR CLEANER CAP WITH AIR CLEANER HOSE (See page 14-24 )
3. REMOVE THROTTLE BODY ASSY
(a) Disconnect the throttle control motor & throttle position
sensor connector.
(b) Disconnect the vacuum hose from the throttle ...
