Toyota Highlander Service Manual: Front differential oil seal (U140F)
REPLACEMENT
HINT: When replacing the front differential oil seal (LH) or (RH), perform step 1 to 11 or 12 to 21 respectively.
1. REMOVE FRONT WHEELS
2. REMOVE ENGINE UNDER COVER NO.1
3. DRAIN AUTOMATIC TRANSAXLE FLUID
(a) Remove the drain plug, gasket and drain ATF.
(b) Install a new gasket and drain plug.
Torque: 49 NVm (500 kgfVcm, 36 ftVlbf)
4. REMOVE FRONT DRIVE SHAFT ASSY LH (SEE PAGE 30-21 )
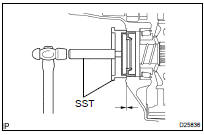
5. REMOVE DIFFERENTIAL SIDE BEARING RETAINER OIL SEAL
(a) Using SST, pull out the oil seal.
SST 09308-00010
6. INSTALL DIFFERENTIAL SIDE BEARING RETAINER OIL SEAL
(a) Using SST and a hammer, drive in a new oil seal.
SST 09726- 27012 (09726- 02041), 09950- 70010 (09951-07200)
Oil seal drive in depth: 0 0.5 mm (0 0.020 in.)
(b) Coat the lip of the oil seal with MP grease.
7. INSTALL FRONT DRIVE SHAFT ASSY LH (SEE PAGE 30-21 )
8. INSTALL FRONT WHEELS
Torque: 103 NVm (1,050 kgfVcm, 76 ftVlbf)
9. ADD AUTOMATIC TRANSAXLE FLUID
10. INSPECT AUTOMATIC TRANSAXLE FLUID (SEE PAGE 40-2 )
11. REMOVE ENGINE ASSEMBLY WITH TRANSAXLE (SEE PAGE 14-24 )
12. REMOVE FRONT DRIVE SHAFT ASSY RH (SEE PAGE 30-21 )
13. REMOVE TRANSVERSE ENGINE ENGINE MOUNTING BRACKET (SEE PAGE 31-9 )
14. REMOVE TRANSFER ASSY (SEE PAGE 31-9 )
15. REMOVE TRANSAXLE HOUSING OIL SEAL
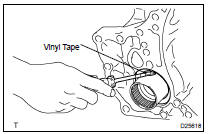
(a) Using a screw driver with vinyl tape wound around its tip, remove the oil seal.
NOTICE: Be careful not to damage the housing.
16. INSTALL TRANSAXLE HOUSING OIL SEAL
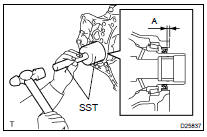
(a) Using SST and a hammer, drive in a new oil seal.
SST 09309-37010
Oil seal drive in depth: 6.0 0.5 mm (0.236 0.020 in.)
(b) Coat the lip of the oil seal with MP grease.
17. INSTALL TRANSVERSE ENGINE ENGINE MOUNTING BRACKET (SEE PAGE 31-9 )
18. INSTALL TRANSFER ASSY (SEE PAGE 31-9 )
19. INSTALL FRONT DRIVE SHAFT ASSY RH (SEE PAGE 30-21 )
20. INSTALL ENGINE ASSEMBLY WITH TRANSAXLE (SEE PAGE 14-24 )
 Front differential oil seal (U241E)
REPLACEMENT
1. REMOVE FRONT WHEELS
2. REMOVE ENGINE UNDER COVER NO.1
3. DRAIN AUTOMATIC TRANSAXLE FLUID
(a) Remove the drain plug, gasket and drain ATF.
(b) Install a new gasket and drain plug.
...
 Front differential oil seal (U151E)
REPLACEMENT
1. REMOVE FRONT WHEELS
2. REMOVE ENGINE UNDER COVER NO.1
3. DRAIN AUTOMATIC TRANSAXLE FLUID
(a) Remove the drain plug, gasket and drain ATF.
(b) Install a new gasket and the drain plu ...
More about Toyota Highlander:
Glossary of sae and Toyota terms
This glossary lists all SAE-J1930 terms and abbreviations used in this manual
in compliance with SAE recommendations,
as well as their TOYOTA equivalents.
...
